
How to Use the Point Directions Tool in Stitch Flow
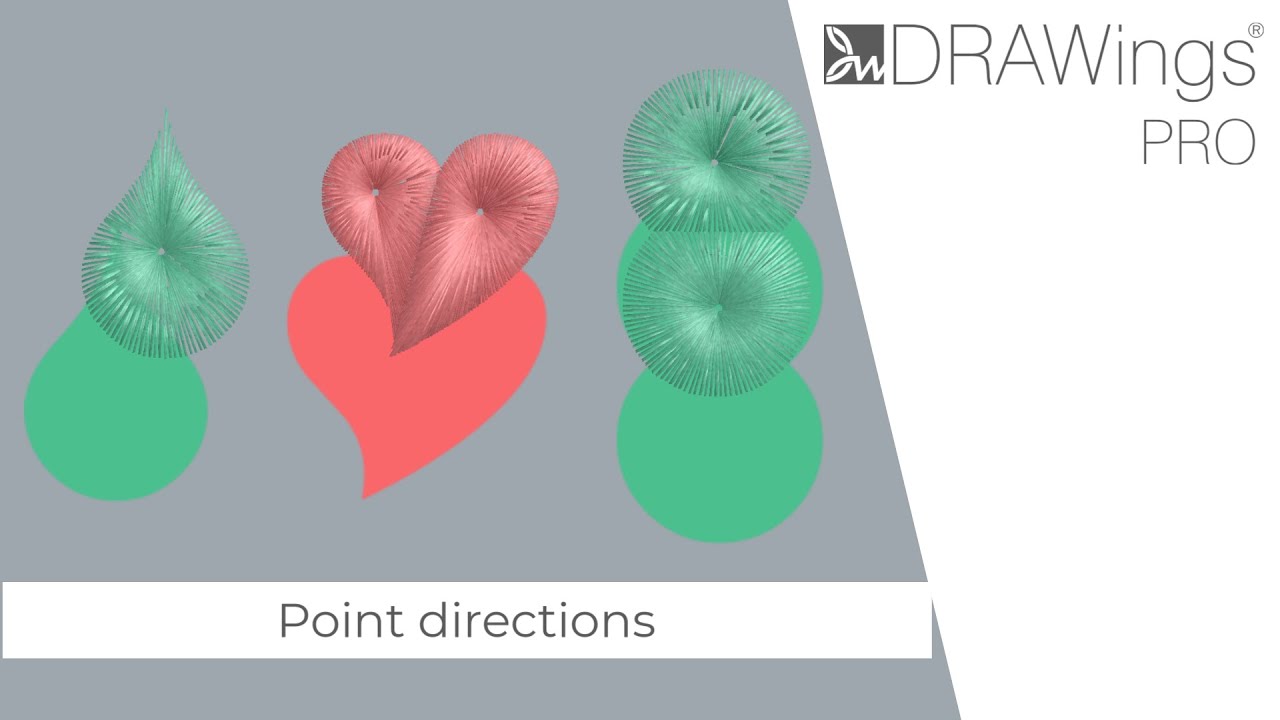
The Point Directions tool allows you to manipulate stitch angles by defining a specific focal point within an object. When applied, stitches are generated starting from the object’s outer edge and converging toward the selected point. This is particularly useful for creating unique radial or center-focused effects on shapes that might not typically utilize standard Satin stitching.
Prerequisites
The Point Directions tool is currently compatible only with the following stitch types:
- Satin
- Piping
Step-by-Step Guide
1. Select Your Object
Ensure the object you wish to edit is selected and is set to either Satin or Piping stitch type.
2. Activate the Point Directions Tool
Locate and select the Point Directions tool within the Stitch Flow interface.
3. Set the Direction Point
Click anywhere inside the selected object to place the direction point.
- Once placed, the software will recalculate the stitches.
- You will see the stitches start from the outline and flow inward toward the point you defined.
4. Adjusting Stitch Density (Crucial Step)
When stitches converge at a single central point, it can create a high density of thread, potentially causing needle breaks or fabric issues.
- Locate the “Add short/long” parameter in the properties panel.
- Enable this setting to ensure that not all stitches reach the exact center point. Some stitches will stop shorter than others, evenly distributing the thread density to prevent bunching.
Useful Tip: Always use the Add short/long parameter for tight circles or small shapes to avoid a “hard spot” in the center of your embroidery which can damage the needle.
5. Editing the Point
You can modify the look of the design instantly by adjusting the point:
- Move: Click and drag the point to a new location within the object. The stitch angles will update dynamically.
- Delete: To remove the effect, hover over the direction point icon and click the X that appears on top of it.
Advanced Usage: Multiple Point Directions
By default, a single object can only support one direction point. However, you can apply multiple direction points to complex shapes using the following method:
- Divide the Object: First, use the Divide tool to split your object into separate sections.
- Apply Individually: Once the object is divided, you can select each new section individually.
- Set Points: Click to set a unique direction point for each division.
Useful Tip: This technique is excellent for creating “fan” effects or complex organic shading where the stitch direction needs to change drastically across a single design element.
Note: While Point Directions can be used on Piping objects to create Spiral effects, this functionality operates differently and is covered in a separate guide.
DRAWings PRO Help Group
Happy crafting and don’t forget to share your creations with us in the
DRAWings PRO Help Group!
Related posts





Projects
How to Modify Built-In Fonts into Custom Designs: Dripping Halloween Lettering
Every embroidery program ships with fonts that are already digitized. They stitch cleanly, and they are also the same fonts everyone else has.Digitizing a Knockout Layered Varsity Monogram with Nested Script Lettering
Layering script text over a bold collegiate letter is a staple in team apparel, varsity jackets, and custom fleece.How to Embroider a Photo onto a T-Shirt with PaintStitch™ and Sketch
A favorite vacation photo does not have to stay on your phone or disappear into a folder. With DRAWings PRO embroidery software, you can turn a photo into an embroidery design and stitch it onto a T-shirt as a wearable keepsake.










