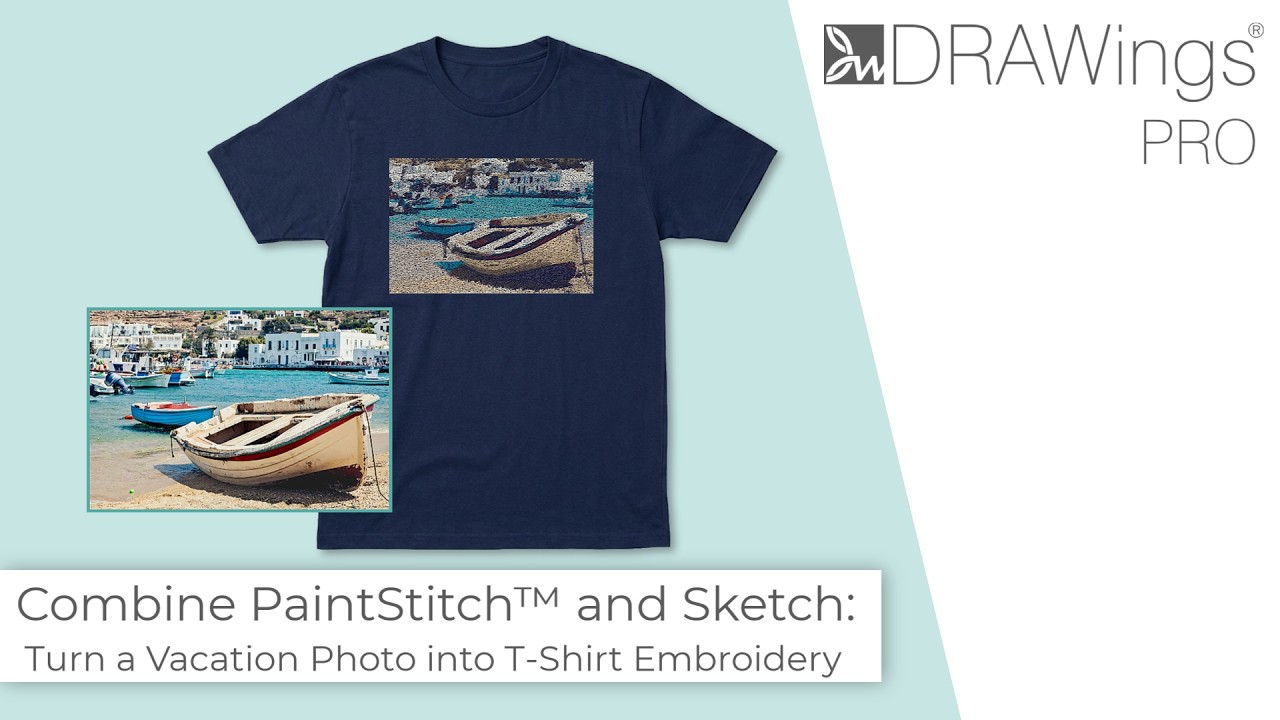
How to Embroider a Photo onto a T-Shirt with PaintStitch™ and Sketch
A favorite vacation photo does not have to stay on your phone or disappear into a folder. With DRAWings PRO embroidery software, you can turn a photo into an embroidery design and stitch it onto a T-shirt as a wearable keepsake.
This project combines two features in DRAWings PRO: PaintStitch™, which translates the colors and details of a bitmap image into stitches, and Sketch, which adds a loose, drawn-style layer over the image. Used together, they create a photo-based design with more definition and an artistic finish.
The project also covers the practical side of machine embroidery on a T-shirt, including fabric settings, hoop selection, placement, stabilization and stitching on knit fabric.
Begin with the Fabric, Not the Photo
From the DRAWings PRO Welcome screen, click Create new to begin a fresh design. Before importing the image, define the fabric that will be used for the finished project.
Press Fabric on the Standard toolbar. In the fabric dialog, open the Embroidery category, choose Normal light, then scroll down to T-Shirt Knit 1 and select it.
This setting matters because DRAWings PRO uses the selected fabric to adjust the embroidery parameters. A knit T-shirt stretches and reacts to stitches differently from a woven fabric. Choosing the correct fabric at the beginning gives the software better information when generating the design.
For a more realistic preview, select Color and use the color wheel to choose a shade close to the actual T-shirt. Confirm the selection with OK. This helps you evaluate the contrast between the fabric and the embroidery threads before stitching begins.
PaintStitch™ designs often show their depth more clearly on a dark background. For this project, a dark T-shirt also helps the lighter thread colors stand out.
Choose a Hoop That Supports the Design
The target size for this photo embroidery is approximately 200 × 150 mm or smaller. The hoop should therefore be selected before converting the photo.
Press the Machine icon on the Standard toolbar and select Change. The dialog lets you choose your embroidery machine and review the hoops that are available for it. Select the hoop whose dimensions are closest to the intended design size.
Using a hoop that closely matches the design is especially useful when working with stretch fabric. A hoop that is much larger than the embroidery area can leave more fabric free to move, increasing the chance of shifting, puckering or distortion.
Because the photo used in this project is wider than it is tall, rotate the hoop to create a landscape workspace. Open Tool options, enter the required value in the rotation field and press Enter. Remember that the hoop rotates counterclockwise, so check its position in the workspace before continuing.
Turn the Photo into a PaintStitch™ Design
With the fabric and hoop prepared, you can now import the bitmap image.
Click From file on the Standard toolbar. Locate the photo in the Browse dialog, select it and press Open.
In the Load image dialog, set the conversion type to Open as PaintStitch™. Adjust the Width to fit the selected hoop and the intended finished size. DRAWings PRO automatically calculates the other resolution values, keeping the proportions of the image consistent.
Press OK to load the converted image into the workspace.
The photo is now a PaintStitch™ object rather than a flat reference image. The Properties toolbar includes controls for further customization, allowing you to change the PaintStitch™ result when a photo needs more interpretation.
For this particular design, the default result is already suitable, so no additional changes are required. Keeping a good default conversion can also prevent unnecessary editing that adds stitches without improving the final embroidery.
For more PaintStitch™ examples and creative ideas, return to the Welcome screen, expand the Tutorials list and type “PaintStitch” into the search bar.
Add a Sketch Layer to Define the Main Shapes
PaintStitch™ carries the colors and visual detail of the photograph, but some images benefit from a stronger sense of structure. A Sketch layer can bring attention to the main shapes without replacing the photo-based stitching underneath.
Keep the PaintStitch™ object selected and click Duplicate in the Tools pane. The duplicate remains aligned with the original, which is important because the two layers need to stitch in exactly the same position.
With the duplicate selected, click the PaintStitch™ icon in the Fill section of the Properties toolbar. From the available options, select Sketch as the new fill type.
The duplicated object now becomes the Sketch layer. While it is still selected, go to the Colors bar and click the Fill bucket icon with the plus sign on the second row to add a new fill color.
Move the small circle inside the color wheel until you reach a dark navy tone.
Dark navy gives the linework enough contrast to define the image while remaining softer than solid black. Depending on the original photograph and garment color, another dark thread may also work, but the Sketch stitch embroidery should remain visible over the PaintStitch™ layer.
Use Slow redraw to simulate the stitching sequence and inspect the complete design. This preview helps confirm that the PaintStitch™ base and the Sketch layer work well together before the design is sent to the embroidery machine.
Prepare Two Useful Printouts
A printout is more than a record of the design. It can also act as a full-size embroidery placement template for the T-shirt.
Click Print on the Standard toolbar to open the Print preview dialog. For this project, create two separate printouts.
For the first printout, set X to 1 so all the design information fits on a single page, then print it. This page provides an overview of the design and the information needed during embroidery.
For the second printout, select Design only. In the Print options, also enable:
- Hoop
- Grid line
- Start-point
Confirm that the scale is set to 100%, then print the page.
The 100% scale is essential. It means the printed design matches the actual embroidery size, allowing the paper to be used for accurate placement on the garment.
Return to the design window and click the Machine icon to send the finished design to the embroidery machine. In this project, the transfer is made through a StitchPort™ device connected to the machine. Use the transfer method supported by your own embroidery setup.
Gather the Materials Before Hooping
Before moving on to the machine embroidery part of the project, prepare the following materials:

- The selected embroidery hoop
- A T-shirt
- Iron-on stabilizer
- Cut-away stabilizer
- The printed design sheets
- Assorted embroidery threads
- Paper tape
- Temporary adhesive spray
- A few clips
Having everything nearby makes it easier to keep the shirt aligned once the placement marks have been made.
Position the Embroidery on the T-Shirt
Accurate placement is important with a design of this size.
Fold the T-shirt in half and mark the front center. Then measure 7 cm down from the collar and mark the position of the design’s top edge.
Place the 100% design printout below the 7 cm mark. Align the printed X-axis with the front center of the T-shirt and secure the paper in place with paper tape.
Next, extend the printed Y-axis outward to mark the side centers on the garment. These reference points will help align the shirt with the embroidery hoop.
The 7 cm measurement is the placement used for this project. Garment size, neckline shape and design dimensions can affect the final position, so always check the full-size printout against the shirt before hooping.
Stabilize the Knit Fabric
Turn the T-shirt wrong side out and fuse a layer of iron-on stabilizer to the back of the embroidery area.
Add another layer of stabilizer using temporary adhesive spray. For the additional support, use a cut-away stabilizer suitable for knit fabric.
These layers are important because a T-shirt stretches while the PaintStitch™ design contains many stitches and thread changes. The cut-away stabilizer remains behind the design after embroidery, helping the fabric retain its shape during wear and washing.
When applying adhesive spray, follow the product instructions and use only enough to hold the layers together. Too much adhesive can make the fabric more difficult to handle.
Hoop the T-Shirt Using the Printed Guide
Place the design printout over the outer hoop. Before aligning the shirt, note how the hoop connects to the embroidery machine.
This small check prevents the design from being positioned correctly on the T-shirt but facing the wrong direction when the hoop is attached to the machine.
Align the inner hoop with the printed design and the placement marks, then finish hooping the shirt. The fabric should be secure, but avoid pulling the knit material out of its natural shape. Stretching the shirt during hooping can cause the embroidered area to contract after the hoop is removed.
Roll the back and loose sections of the T-shirt away from the embroidery area. Use a couple of clips to hold the remaining fabric out of the machine’s path.
Attach the hoop to the machine and inspect the full movement area carefully. Make sure that no part of the shirt is caught beneath the hoop or positioned where the machine will move.
Embroider the PaintStitch™ and Sketch Layers
A ballpoint needle is recommended for machine embroidery on stretch fabric. It is designed to pass between the knitted fibers rather than cutting through them in the way a sharp needle may.
Begin embroidering according to your machine’s instructions. Change the threads as required to complete the PaintStitch™ section. These color changes build the photo-based appearance of the design.
Once the PaintStitch™ embroidery is complete, continue with the Sketch layer on top. Because the Sketch object was created from an aligned duplicate, its lines should fall over the intended shapes and provide the final definition.
When the embroidery is finished, remove the hoop from the machine and take the T-shirt out carefully. Trim the excess stabilizer from the back, leaving enough cut-away support around the design to protect the knit fabric.

Turn a Vacation Memory into Something You Can Wear
The finished result is a custom embroidered T-shirt that turns a vacation photo into a permanent keepsake. PaintStitch™ carries the colors and details of the original image, while the Sketch layer adds a clear visual accent.
The same approach can be used for family photographs, landscapes, pets and personalized gifts. Try different photos, fabric colors and thread palettes to see how each choice changes the result. Dark fabrics can give PaintStitch™ designs more contrast, while the Sketch color can be adjusted to suit both the image and the T-shirt.
With the right fabric settings, hoop, stabilizer and full-size placement template, photo embroidery on knit fabric becomes a manageable project—and a useful way to turn personal images into something that lasts.
Share your finished T-shirt or questions in the comments or our facebook post, and subscribe for more creative machine embroidery projects and DRAWings PRO tutorials.


Happy crafting and don’t forget to share your creations with us in the
DRAWings PRO Help Group!
You can download the .DRAW file of the project and the image used, for free, from the link below:
- Project’s .DRAW file: How to Embroider a Photo onto a T-Shirt with PaintStitch™ and Sketch
It can open only with the XII and later versions of DRAWings embroidery software
Share your experiences in our Facebook group, and don’t forget to subscribe to our blog for more innovative embroidery techniques and inspiration.