
How to Create Curved Stitch Directions and Curved Divides in DRAWings PRO XII
This guide explains how to use the Stitch Flow tool to add organic movement to your designs. By transitioning from straight lines to curved paths, you can ensure your embroidery naturally follows the contours of your artwork, resulting in a more professional and high-quality finish.
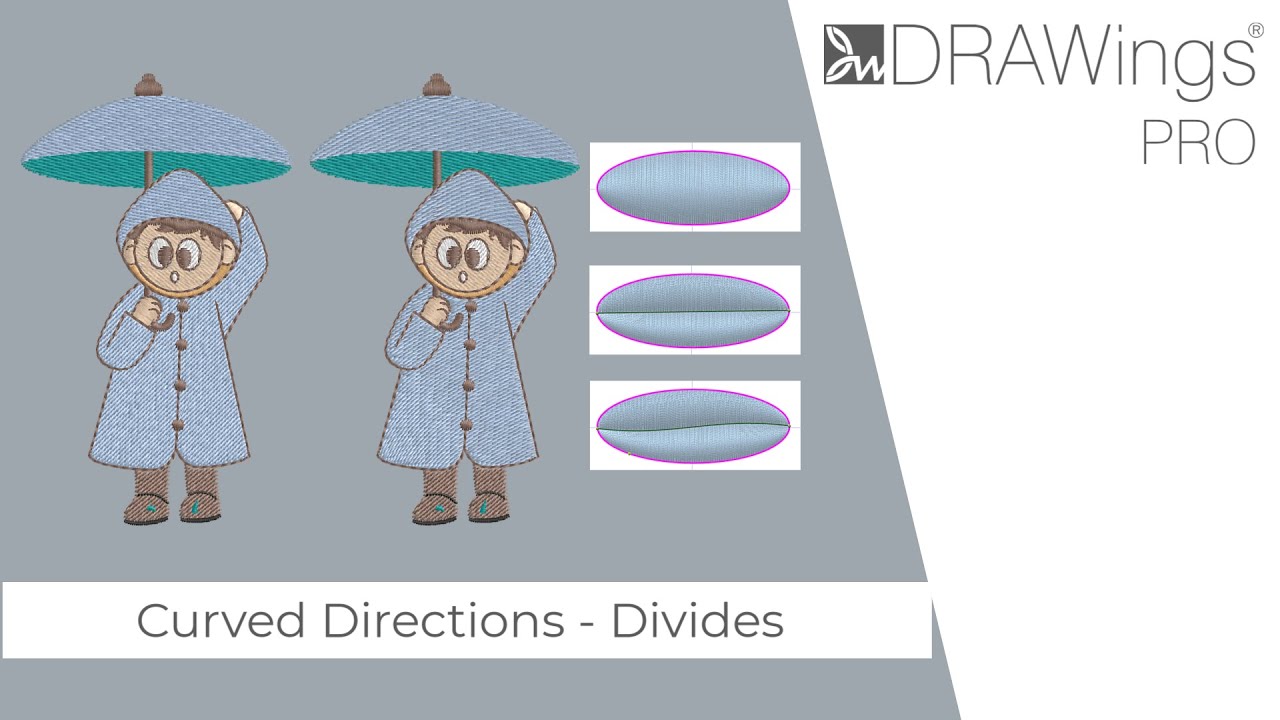
Part 1: Creating Curved Stitch Directions
Curved stitch directions allow you to change the angle of stitches within a shape so they follow a specific path.
Requirement: Curved directions can only be applied to objects filled with the Step stitch type.
- Select the Object: Ensure your object is set to a Step fill.
- Activate the Tool: Click on the Stitch Flow tool from the toolbar.
- Define the Direction: Click and drag across the object to draw a straight direction line.
- Reshape into a Curve: Click on any point along the direction line you just drew and drag it. The line will bend into a curve, and the stitches will automatically adjust to follow this new path.
- Create Waves (Optional): To create wave-like stitch patterns, drag different points of the direction line in opposite directions.
💡 Pro Tip: For the best physical embroidery results, avoid creating extremely sharp or large curves. Smaller, more gradual curves produce higher-quality stitch consistency and prevent tension issues.
Part 2: Creating Curved Divides
Curved divides are used to split stitch segments, creating specific penetration points that add texture and visual interest to your fills.
Requirement: Curved divides can only be applied to objects filled with Satin or Piping stitch types.
- Select the Object: Click on an object filled with either Satin or Piping stitches.
- Activate the Tool: Click on the Stitch Flow tool.
- Draw the Divide: Click and drag to draw a line across the object where you want the stitches to be divided.
- Curve the Divide: Click on a point on the divide line and drag it to create a curve.
- Adjust for Waves: If you want wavy penetration points, drag the line in opposite directions at different points. This is particularly effective for creating movement in satin-filled scrolls or floral elements.
Summary Table: Feature Compatibility
| Feature | Compatible Stitch Types | Primary Use |
| Curved Direction | Step Fill | Changing stitch flow to follow organic shapes. |
| Curved Divide | Satin, Piping | Creating curved penetration points/breaks in stitches. |
Troubleshooting Stitch Flow in DRAWings PRO XII
If your stitch flow lines are not appearing as expected or the tools seem unresponsive, it is usually due to a conflict between the tool and the object’s current settings. Follow these steps to diagnose and fix common issues.
1. Check Stitch Type Compatibility
The most common reason a tool doesn’t work is that it is being applied to an incompatible stitch type. The Stitch Flow tool functions differently depending on how the shape is filled.
- Issue: I cannot create a Curved Direction.
- Fix: Check the Object Properties. Curved directions are exclusive to Step fills. If your object is set to Satin or Appliqué, the tool will not function for direction curving.
- Issue: I cannot create a Curved Divide.
- Fix: Curved divides only work on Satin or Piping stitches. If the object is a Step fill, the “Divide” functionality will not be available.
2. Verify the Object is Selected
The Stitch Flow tool requires an active selection to know which path to modify.
- The Symptom: You click the tool, but clicking and dragging on the workspace does nothing.
- The Fix: 1. Switch to the Select tool (pointer).2. Click on the specific object you wish to edit.3. Then select the Stitch Flow tool. The object must remain highlighted for the tool to “snap” to its boundaries.
3. Overlapping Direction Lines or Divides
If you have already applied multiple direction lines or divides, the software may struggle to calculate the stitch path, leading to unexpected “glitchy” patterns.
- The Symptom: Stitches are jumping across the shape or appearing messy.
- The Fix: * Look for existing direction lines. If they cross each other, the stitch engine may fail.
- Try deleting existing lines and starting with one single, clean curve.
- Pro Tip: Use the Edit Nodes mode to see if there are hidden direction points that need to be cleared.
4. Shape Complexity and “Holes”
If an object has very complex boundaries or internal “holes” (cut-outs), the stitch flow may struggle to wrap around the geometry.
- The Symptom: The curve looks correct, but the stitches don’t follow it in certain areas.
- The Fix: * Ensure the direction line or divide starts and ends outside or exactly on the boundary of the object.
- If the shape is too complex (e.g., a very thin, swirling vine), try breaking the object into two smaller sections and applying the stitch flow to each individually.
5. View Mode Settings
Sometimes the lines are there, but you simply cannot see them because of your display settings.
- The Symptom: The stitches changed, but the control line is invisible.
- The Fix: * Check your View Layers. Ensure that “Helplines” or “Object Outlines” are toggled to Visible.
- Ensure you are not in a “3D Preview” mode that might hide technical vector lines. Switch to Normal or Wireframe view to see the flow paths clearly.
DRAWings PRO Help Group
Happy crafting and don’t forget to share your creations with us in the
DRAWings PRO Help Group!
Related posts





Projects
How to Modify Built-In Fonts into Custom Designs: Dripping Halloween Lettering
Every embroidery program ships with fonts that are already digitized. They stitch cleanly, and they are also the same fonts everyone else has.Digitizing a Knockout Layered Varsity Monogram with Nested Script Lettering
Layering script text over a bold collegiate letter is a staple in team apparel, varsity jackets, and custom fleece.How to Embroider a Photo onto a T-Shirt with PaintStitch™ and Sketch
A favorite vacation photo does not have to stay on your phone or disappear into a folder. With DRAWings PRO embroidery software, you can turn a photo into an embroidery design and stitch it onto a T-shirt as a wearable keepsake.










