Create a Mixed Media Photo Embroidery Keepsake with PaintStitch™
Embroidery software has evolved beyond simple text and basic designs. Today’s technology allows us to transform photographs into embroidered keepsakes that preserve memories in a tangible, artistic form. DRAWings PRO’s patented PaintStitch™ feature represents a significant advancement in this field, enabling users to create photorealistic embroidery that captures the detail and emotion of original images.
This guide explores the process of creating a mixed media photo embroidery project using DRAWings PRO. The technique combines heat transfer printing with PaintStitch™ embroidery to achieve fuller colors and crisp definition, particularly important when working with smaller embroidery sizes. The result is a framed photo keepsake suitable for gifts or personal mementos.

Understanding PaintStitch™ and Its Applications
PaintStitch™ uses decorative stitches to recreate photographic images in thread. Unlike traditional digitizing methods that convert images into solid fill areas, this technology analyzes the photograph and applies stitches that mimic the texture and detail of the original image. The result resembles actual embroidery rather than a printed transfer.
The advantage of this approach lies in its ability to create depth and dimension. Traditional embroidery fills can appear flat, but PaintStitch™ adds visual interest through varied stitch angles and densities. When working with portraits or photographs with subtle details, this technology captures nuances that standard conversion methods miss.
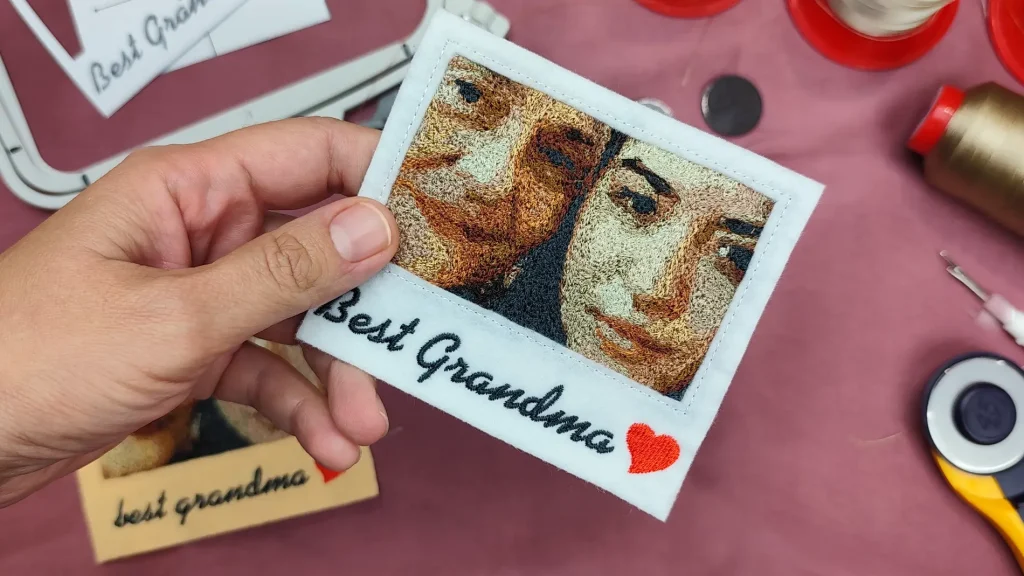
For this project, we’re creating a framed photograph with a personal message—perfect for gifts to grandparents, family members, or anyone who appreciates handmade items. The addition of a retro-style frame and customizable text transforms a simple photo into a complete design piece.
Setting Up Your Design Workspace
Beginning any embroidery project requires proper workspace preparation. In DRAWings PRO, starting with a new design provides a clean canvas for your work. The software’s interface allows you to import images directly, which initiates the conversion process.
When importing your photograph, the software presents multiple conversion options. Selecting “Open as PaintStitch” tells the software to analyze the image specifically for this stitch type rather than attempting automatic vectorization or standard fill conversion. This choice determines how the software interprets color gradients, shadows, and highlights in your photograph.
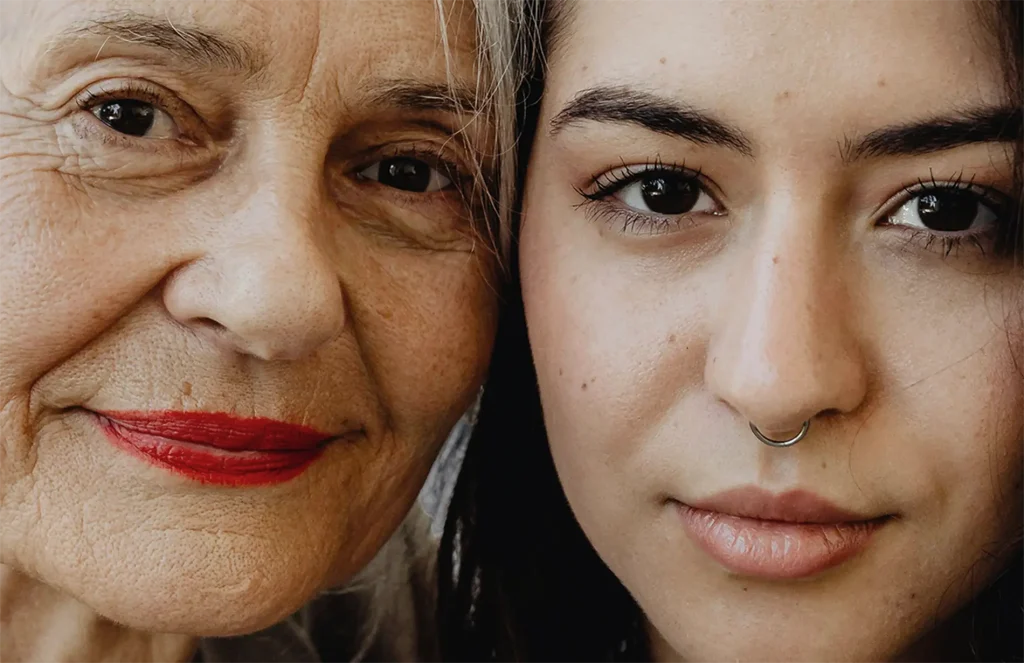
The photorealistic design appears on your workspace immediately, but you’ll likely want to work with a specific portion of the image rather than the entire photograph. This selective approach allows you to focus on the most meaningful part of the image while maintaining manageable dimensions for embroidery.
Defining Your Image Area and Dimensions
Most photographs contain more content than needed for a focused embroidery design. Creating a rectangular outline serves multiple purposes: it defines the exact area you want to embroider, establishes precise dimensions, and creates a boundary for the clipping region.
For this project, dimensions of 100mm by 65mm create a portrait-oriented frame suitable for faces or vertical compositions. These measurements represent a practical size for embroidery—large enough to capture detail but small enough to complete within reasonable timeframes and fit standard hoops.
The rectangle functions as a digital cropping tool. By setting specific width and height measurements, you ensure consistency across multiple projects and maintain control over the final proportions. Adding an outline without fill color makes the boundary visible without interfering with the image beneath.
Positioning this rectangle over your desired image section requires consideration of composition. Center the most important elements—typically faces or focal points—within the frame. The clipping region function then restricts the PaintStitch™ area to only what falls within your defined rectangle, effectively removing everything outside these boundaries.
Customizing PaintStitch™ Settings for Optimal Results
The Properties toolbar provides access to PaintStitch™ customization options that significantly impact your final result. These settings control how the software interprets your photograph and translates it into stitches.
Color palette selection determines which thread colors the software uses to recreate your image. Limiting the palette to available thread colors in your collection ensures you can complete the project without purchasing additional supplies. The software maps photograph colors to the nearest thread equivalents, creating a realistic representation within the constraints of available materials.
Blending controls how the software transitions between different colors and tones. Setting this parameter to low creates more distinct color separations, which can enhance clarity in smaller embroidery sizes. High blending produces smoother gradients but may lose definition in compact designs.
Contrast adjustment proves particularly valuable when embroidering portraits. Increasing contrast enhances facial features by emphasizing the difference between light and shadow areas. This adjustment compensates for thread’s inherent texture, which can soften details compared to printed images. Well-defined features read more clearly in the finished embroidery, especially when viewed from a distance.
Designing the Retro Frame Structure
The frame transforms a simple embroidered photograph into a complete design piece. Using DRAWings PRO’s Autoborder function creates shapes relative to your image size, ensuring proportional relationships between the photograph and its surrounding elements.
The first border sits inside the image boundary, creating a subtle separation between the photograph and the frame. A 2.0mm distance with running stitch type provides a delicate line that defines the image edge without overwhelming the composition. Running stitches use less thread and stitch faster than satin or fill stitches, making them ideal for decorative elements.
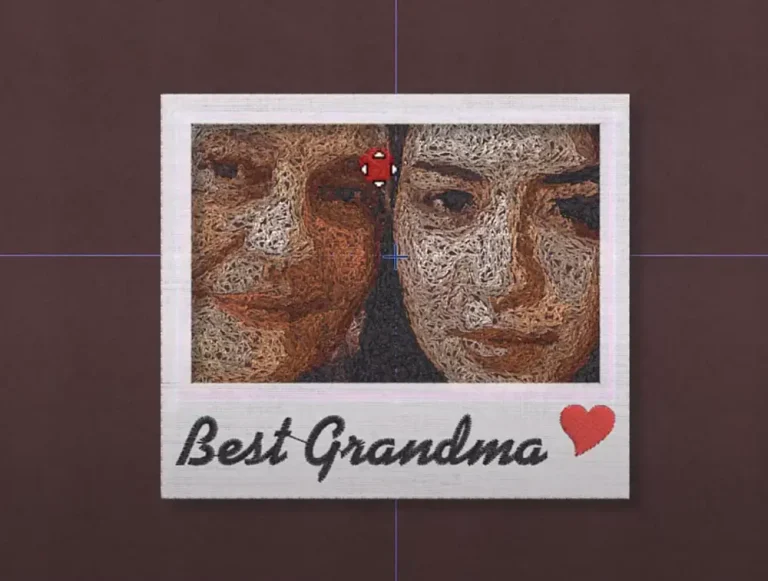
The second border extends outward, establishing the frame’s outer boundary. A 5.0mm distance creates adequate space for the frame structure while maintaining visual balance with the central image. This border eventually becomes part of the applique base, so its dimensions affect the entire project’s final size.
Adding extra height to the outer border creates space for personalization. Increasing the height by 20mm—from 75.3mm to 95.3mm in this case—provides room for text at the bottom while keeping the top, left, and right margins consistent. Adjusting the Y-axis position by -10mm centers this expanded border vertically, moving it downward to create even spacing above and below the image.
Creating the Applique Base
Combining both borders into a single shape establishes your fabric applique base. The combine function merges separate elements into one object, which simplifies the applique process and ensures the frame stitches as a unified piece.
Applique technique involves layering fabric over your base material and securing it with stitches. This approach adds dimension to your embroidery while providing color coverage with less density than traditional fill stitches. The result is a cleaner reverse side and reduced stitch count, which minimizes the risk of fabric puckering.
Setting a white fill color creates a classic frame appearance that complements most photographs. White provides neutral contrast that doesn’t compete with image colors while maintaining a clean, professional look. The applique fill type tells the software to generate placement lines, tack-down stitches, and finish stitching appropriate for fabric applique rather than standard fill stitching.
Removing the outline color eliminates unnecessary stitching around the frame perimeter. Since the applique process includes tack-down stitches that secure the fabric edges, an additional outline becomes redundant and adds bulk without visual benefit.
Adding Personalized Text Elements
Text personalization transforms a generic design into a meaningful gift. DRAWings PRO’s lettering tool provides access to various fonts, with xpg210 offering clear readability at 15.0mm size. This font size ensures legibility while fitting comfortably within the created space at the frame’s bottom.
Clicking inside the designated area sets the text starting point, allowing you to position lettering precisely. Messages like “Best Grandma” or “Best Grandad” add sentimental value that recipients appreciate. Dark thread colors create strong contrast against the white applique base, ensuring the text stands out clearly.
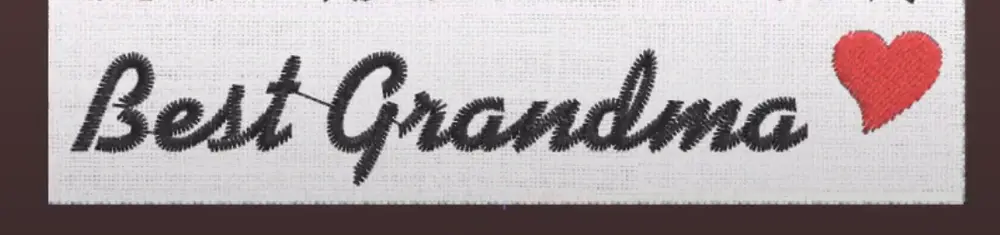
Placement adjustment capabilities allow you to center text or align it according to design needs. This flexibility ensures professional-looking results regardless of message length. Consider the visual weight of your text relative to other design elements—too large and it overwhelms the photograph; too small and it becomes illegible.
Incorporating Decorative Symbols
Symbols add visual interest and emotional resonance to your design. The Webbings font includes various icons, including heart shapes that complement sentimental projects. Inserting symbols through the Tools menu provides access to these decorative elements without leaving your current design workspace.
Click-and-drag placement allows you to position symbols intuitively. Sizing handles enable scaling to appropriate proportions. For this project, a small heart symbol adds a decorative accent without competing with the photograph or text for visual attention.
Color selection for symbols should consider overall design harmony. Choosing colors that appear in your photograph creates cohesion, while contrasting colors make symbols pop. Removing outlines from symbols maintains consistency with the applique frame treatment and reduces unnecessary stitching.
Setting “Remove overlaps” to Never prevents the software from automatically modifying your design to eliminate overlapping stitches. While overlap removal typically improves embroidery quality, it can interfere with applique placement lines and tack-down stitches. Manual control over this setting ensures your applique stitches correctly.
Understanding the Mixed Media Approach
The mixed media technique combines heat transfer printing with PaintStitch™ embroidery to achieve superior results in small-scale projects. This approach addresses a common challenge in photo embroidery: maintaining color saturation and detail clarity at reduced sizes.
When embroidering small images, thread coverage may not fully saturate the background fabric, potentially allowing fabric color to show through and muddy the photograph’s appearance. Additionally, precise shape distinction becomes difficult when working at miniature scales. The mixed media solution places a heat transfer print of your image beneath the PaintStitch™ embroidery.
The printed image provides complete color coverage and crisp edges, while the embroidery adds texture and dimension. This combination produces fuller colors than embroidery alone while maintaining the tactile quality that makes embroidered items special. The technique proves particularly effective for facial features and detailed areas where color accuracy matters.
Preparing the Print Template
Creating an accurate print template ensures proper alignment between the printed image and subsequent embroidery. This template functions as a physical guide during the fabric preparation process.
Making a copy of your finished design allows you to modify elements without affecting your embroidery file. Selecting the image and applying an autoborder with zero distance creates a precise outline that follows the image edges exactly. This outline serves as a cutting guide when transferring the template to paper.
Deleting the image after creating its outline leaves only the boundary shape, which is all you need for the template. When printing, selecting “Design only” removes unnecessary elements like start points, 3D previews, hoops, and grid lines from your printout. These features help during digital design but add clutter to physical templates.
Verifying 100% scale before printing ensures your template matches your embroidery dimensions exactly. Scale variations cause misalignment issues during assembly, so this verification step prevents frustrating mistakes later in the process.
Fabric Preparation and Stabilization
Proper fabric preparation determines embroidery success more than any other factor. Applying iron-on stabilizer creates a firm foundation that prevents fabric stretching during stitching. One layer typically suffices for medium-weight fabrics, though heavier materials may require additional stabilization.
Adding cutaway stabilizer underneath provides permanent support for the finished embroidery. Unlike tear-away stabilizers removed after stitching, cutaway remains in place, preventing distortion over time. This choice matters particularly for keepsakes intended to last years or decades.
Folding the fabric to mark its center establishes reference points for accurate design placement. These center lines correspond to hoop markings and design center points, creating an alignment system that ensures your embroidery appears exactly where intended. Taking time to mark these lines carefully prevents misalignment that becomes apparent only after completing the entire project.
Positioning the Heat Transfer Image
The printed template’s outline guides heat transfer placement. Cutting around this outline creates a physical pattern that matches your embroidery dimensions exactly. This tangible guide proves more reliable than attempting to measure and position the transfer by eye.
Aligning the template’s center with your fabric’s marked center point uses your previously established reference system. A pin holds the template in position while you verify alignment, preventing shifting during the marking process. Double-checking that the template’s center line matches the fabric’s center line ensures proper orientation in both directions.
Marking the image position directly on the fabric creates a target area for your heat transfer. These marks guide placement when you’re ready to iron the transfer onto the fabric. Accuracy at this stage determines whether your printed image aligns correctly with the embroidered elements that will overlay it.
Printing and Applying the Heat Transfer
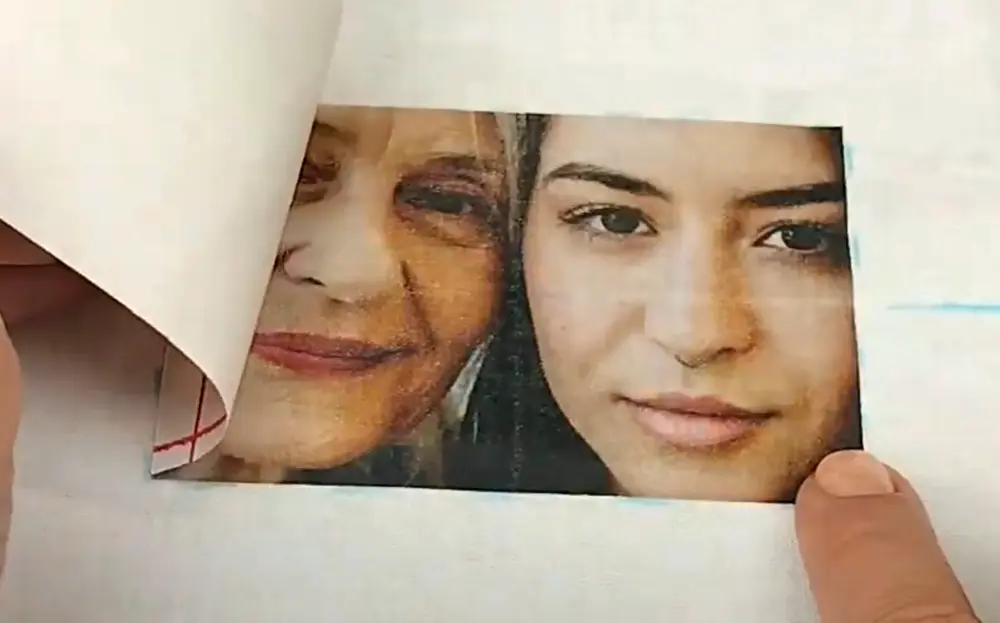
Returning to your original design copy and removing all elements except the photograph prepares the file for heat transfer printing. The “Print Artwork” function outputs images suitable for transfer paper rather than standard embroidery templates.
Unchecking header and binder space maximizes usable print area and eliminates distracting elements from your transfer. The mirror function becomes critical when using heat transfer paper—forgetting this step results in a reversed image after transfer. Text and asymmetrical images make mirroring mistakes immediately obvious and uncorrectable.
Following your transfer paper’s specific instructions for time, temperature, and pressure ensures proper adhesion. Different brands and paper types have varying requirements, so consulting the manufacturer’s guidelines prevents transfer failures. Allowing the transfer to cool completely before removing the backing paper prevents the image from lifting or smearing.
Hooping and Embroidery Execution
Hooping the prepared fabric requires attention to alignment. Matching hoop marks with your fabric’s center lines ensures the embroidery stitches exactly where planned. Misalignment at this stage causes the embroidered frame to sit off-center relative to the printed image, ruining the layered effect.
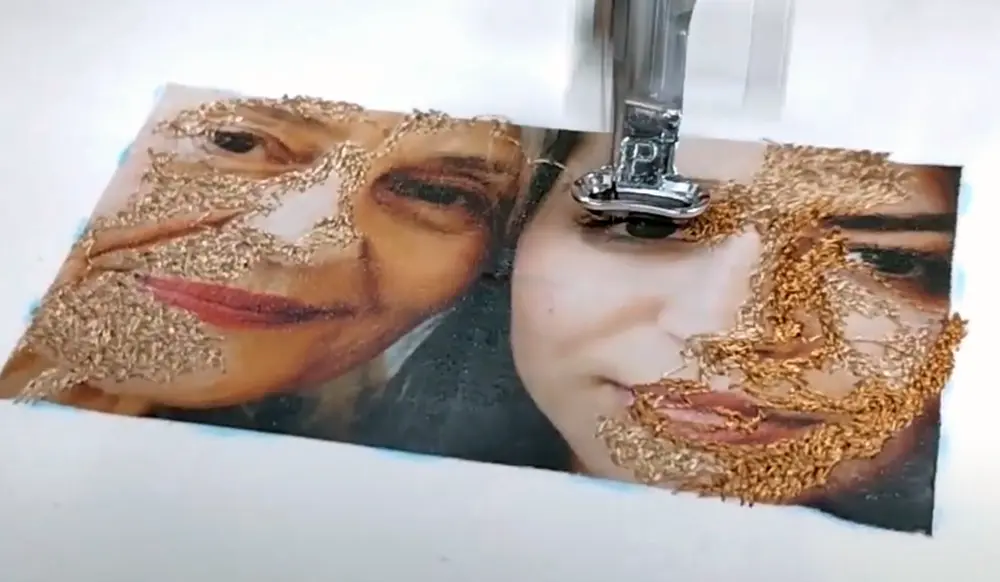
Loading the design onto your embroidery machine initiates the stitching sequence. The machine begins with PaintStitch™ embroidery, adding texture and detail over the printed image. Changing threads according to the design’s color sequence ensures accurate color representation throughout the photorealistic portion.
Following PaintStitch™ completion, the machine stitches the placement line for your applique. This line marks where you’ll position the felt frame material. The placement stitch uses a contrasting thread color that remains visible beneath the felt, guiding accurate fabric positioning.
Applique Assembly and Completion
Cutting two felt pieces slightly larger than your frame pattern provides material for both the visible frame and backing layer. White felt creates the classic photo frame appearance while offering enough body to stand away from the base fabric slightly, adding dimension to the finished piece.
Covering the placement stitch with one felt layer and continuing with tack-down stitching secures the frame material. The tack-down stitch penetrates both the felt and base fabric, creating a permanent bond. Subsequent finish stitching around the frame edges covers raw felt edges and adds decorative detail.
Embroidering the message and heart symbol completes the stitching sequence. These elements stitch on top of the applique frame, ensuring they remain visible and prominent in the finished design.
Finishing and Assembly
Careful trimming transforms raw embroidery into a polished keepsake. Using tack-down stitches as cutting guides ensures clean edges that align with the frame design. Sharp scissors make precise cuts possible, though working slowly near stitching lines prevents accidental thread cutting.
Making a small cut through the felt layer inside the frame creates an access point for cutting around the photograph. Cutting next to the stitch line removes excess felt while preserving the embroidered border that secures it. This step reveals the photograph through the frame opening, completing the visual composition.
Backing the piece with the second felt layer adds stability and conceals thread work on the reverse side. This backing creates a clean presentation whether the keepsake is displayed on a surface or mounted on a refrigerator. Attaching a magnet provides practical display options without requiring frames or mounting hardware.
Conclusion
Creating a mixed media photo embroidery keepsake demonstrates how modern embroidery software enables projects that were previously impractical or impossible. DRAWings PRO’s PaintStitch™ technology, combined with thoughtful design choices and proper execution, produces results that preserve memories in a unique, handcrafted form.
The mixed media approach solves technical challenges inherent in small-scale photo embroidery while maintaining the dimensional quality that makes embroidered items special. Taking time to prepare templates, align elements accurately, and execute each step carefully ensures professional results that recipients will treasure.
These techniques apply beyond this specific project. Understanding how PaintStitch™ settings affect output quality, how applique adds dimension, and how mixed media techniques enhance small designs enables you to approach future projects with confidence. Each keepsake you create builds skills that translate to increasingly complex and creative work.
Happy crafting and don’t forget to share your creations with us in the
DRAWings PRO Help Group!
You can download the .DRAW file of the project and the image used, for free, from the link below:
- Project’s .DRAW file: Create a Mixed Media Photo Embroidery Keepsake with PaintStitch™
It can open only with the XI and later versions of DRAWings embroidery software
We’d love to see your embroidered creations! Share your finished scalloped napkins with our community and don’t forget to follow us for more inspiration and tutorials that help you get the most from your embroidery software.
Share your experiences in our Facebook group, and don’t forget to subscribe to our blog for more innovative embroidery techniques and inspiration.
Frequently Asked Questions
Check also, our related projects
How to Modify Built-In Fonts into Custom Designs: Dripping Halloween Lettering
Every embroidery program ships with fonts that are already digitized. They stitch cleanly, and they are also the same fonts everyone else has.Digitizing a Knockout Layered Varsity Monogram with Nested Script Lettering
Layering script text over a bold collegiate letter is a staple in team apparel, varsity jackets, and custom fleece.How to Embroider a Photo onto a T-Shirt with PaintStitch™ and Sketch
A favorite vacation photo does not have to stay on your phone or disappear into a folder. With DRAWings PRO embroidery software, you can turn a photo into an embroidery design and stitch it onto a T-shirt as a wearable keepsake.