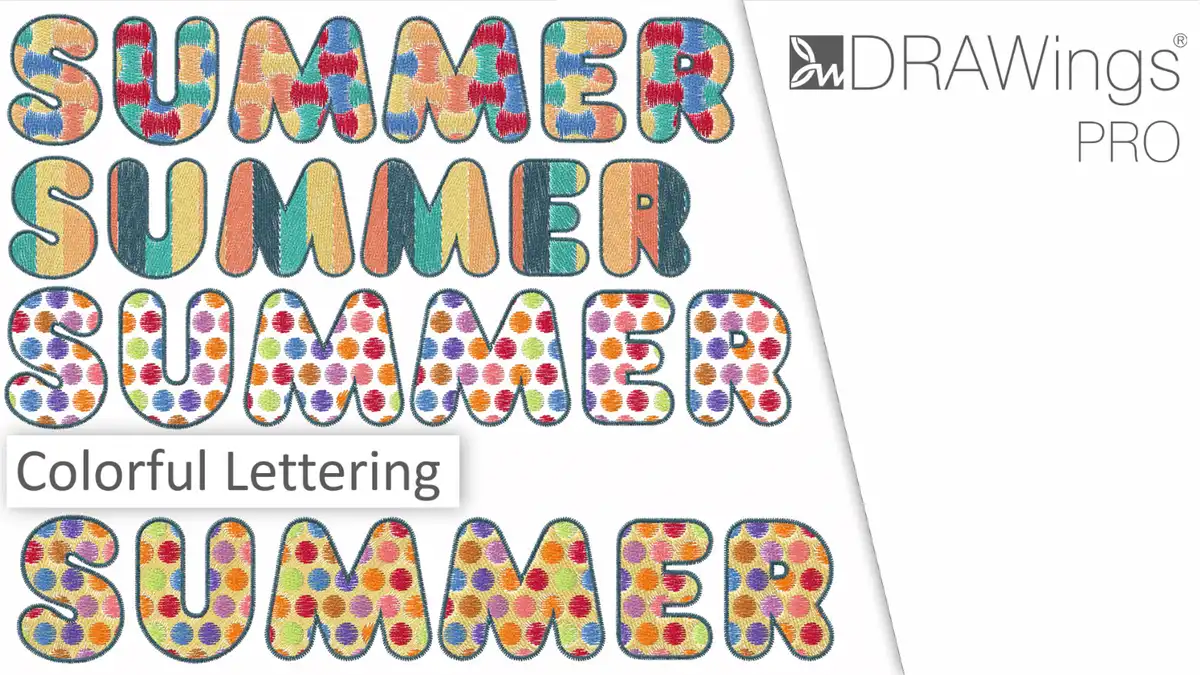
Colorful lettering with DRAWings PRO
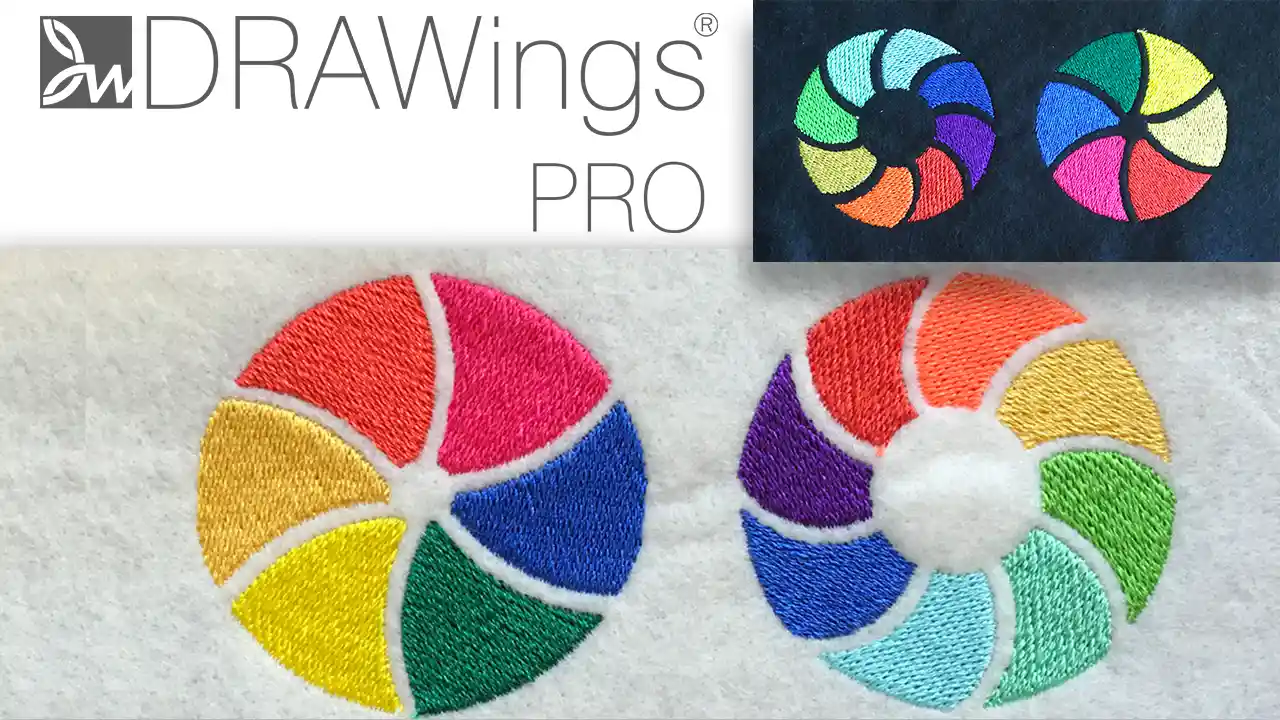
It is very easy to create a colorful lettering with DRAWings PRO. In this video we will show you how to get creative with color-filled letters. It is easy to make them and fun in the process.

When creating designs with colorful elements, you first need to spend some time to define a color scheme. Coming up with a color scheme isn’t always an easy task. Usually, it’s easier to pick an image with a palette of colors close to what you want to use for your design and use this as your guide.
In that case, open the image and trace it; its colors then appear on your color manager. Likewise, you may wish to find an old design of yours with multiple colors that can be used on the new design and copy them. Sometimes, I copy a design and then draw small rectangles at the bottom of my hoop with all the different colors that I would like to incorporate. In this way, I have my own set of colors handy at the bottom of my screen.
Create the fill pattern object
We will start with a new design and then create the shape with the apple core. The software comes with a set of designs that are installed in your documents folder, in a sub-folder called embroidery designs. There you can find the Apple core design.
Move it to the upper part of the hoop and edit it in the node editor by remove the nodes that are outside the apple core. Then we can make it smaller, since it will be used to created a fill pattern for lettering.
Create the lettering design
Since we want a fill pattern, I will set a fill color and remove the outline. At this point, at the lower part of my hoop I will create a rectangle of the area I want to cover. We will start the lettering tool and type the slogan we want. Adjust text options and size if necessary.
Use the object to create a colored pattern array
Now that we know the approximate size to be covered, let’s get back to the fill pattern. Select the apple core and start the rectangular array tool. We will set 6 horizontal copies and only 2 vertical for now, since we want to first make the color pattern and then we will multiply it. Rotate these copies and change the distance between them so that it becomes a continuous pattern and apply the array.
Now we will load an old design of mine to copy its color scheme. Since, we only want to copy the colors, we will keep just the small circles and then we will copy them into my new design. Let’s start coloring the apple cores. Once you have used all colors you wanted you can delete the circles.
Start the array tool once again and this time, multiply the colored pattern in order to fill the desired area.
Adjust the spacing so that the pattern is continuous and then adjust the number of copies, horizontally and vertically. At this point we will select all the apple core groups and ungroup them. We will delete the last 3 columns, since they don’t fit into the hoop. Select all the apple cores and make them one group for easier handling later on. Our fill pattern is ready.
Finish the colorful lettering design
Select the lettering part together with the rectangle, right-click and use the ordering option to Front of the design. Move them on top of the fill pattern. We want the rectangle to fully cover the fill pattern. Select the text object together with the rectangle, right click and use the combine option. In this way we’ve created holes on the rectangle in the shape of the text.
Select the rectangle part and add a Satin serial outline, with 1mm outline, in order to decorate the letters later on. In case you don’t like what is visible through the holes, you can move the lettering parts using the node editor to achieve better placement.
Select the rectangle along with the fill pattern group and from the Shaping menu use Trim option. Move the rectangle out of the way and see the text created with the apple cores fill pattern. Ungroup the fill pattern group and remove any unnecessary parts.
If you wish to have a satin serial outline around the letters go to the rectangle part, right click and use the option Convert outline to object. Delete the fill of the rectangle, break the outline apart and remove the outer frame. Now, group the outline letters. Likewise, group the pattern fill letters. Finally, select both groups and using the align tools center them together.
The design is ready!!! Unleash your creativity and create your own unique fill patterns.

You can download the .DRAW file of the project, for free, from the link below:
- Project’s .DRAW file: Colorful lettering
It can open only with the latest version of DRAWings embroidery software
Check also, our related project “Embroidered cherry blossom coasters“