Create an embroidery design for the 4th of July celebration!
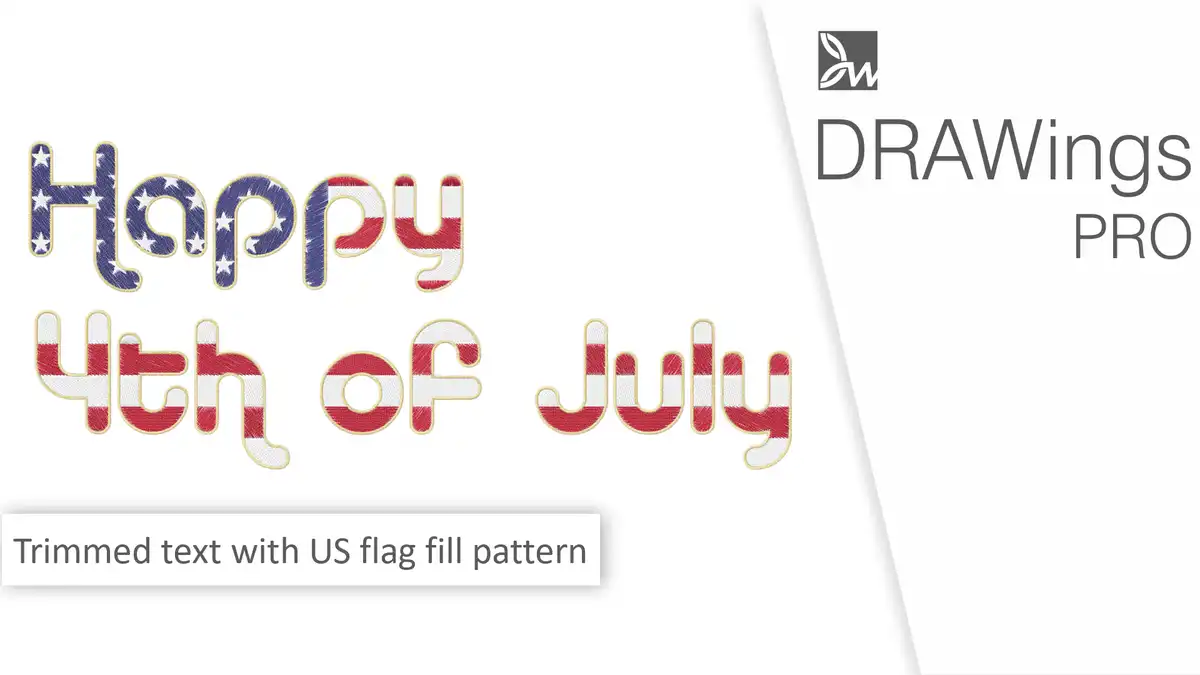
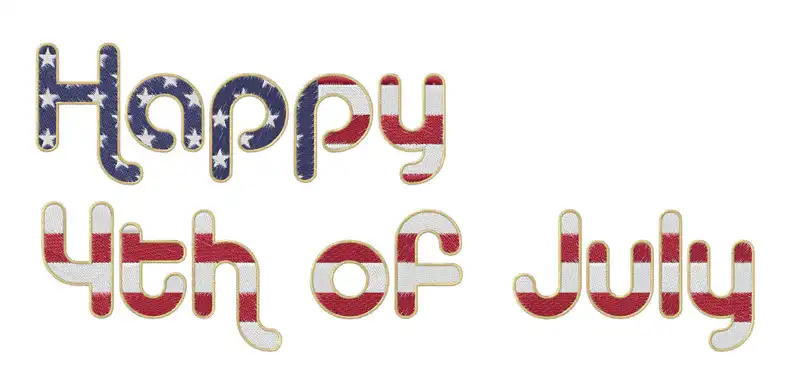
For the upcoming celebration of the 4th of July, we’ve put together a video tutorial on how to create an embroidery design with the flag of the United States of America and then how to make a trimmed text using this US flag design as a fill pattern. This design is perfect for the 4th of July celebrations!

Things to Know When Crafting with a United States Flag Design:
The US flag has 13 equal sized stripes. The top stripe should be red and then alternate red and white. The blue part of the flag is called the union. The union should always be in the top left corner. The bottom of the union should line up with the bottom of a red stripe. The United States flag has 50, five point stars which should be arranged in nine offset horizontal rows, where rows of six stars (top and bottom) alternate with rows of five stars.
Create the flag design
We will start from the horizontal lines. Start the “insert rectangle” tool and click and drag to draw a rectangle like a long line. Using the “Tools options” bar we will set the width at 290mm or 11.4in and the height at 11mm or 0.43in.
Now using the “array” tool we will create 12 repetitions of this line. At “Tools options” set 1 for the horizontal copies and 13 for the vertical copies. Set “vertical spacing” to 0 and apply the array.
Then select 7 of the lines and set their color to red. With all shapes selected, set the flag centered to the center of the axis.
Start the “rectangle” tool once again and create a rectangle on top of the left part of the 7 upper lines, set that fill color to blue, make sure proportional is disabled and set its width to 120 mm or 4.7in approximately.
Its bottom edge should line with the bottom of a red stripe, so adjust its size if necessary. We don’t need the black outlines, so select all shapes and set the outline to none.
Make the stars of the flag
Start the “star” shape tool and set the “Νumber of rays” at 5 the “Ray size” at 60%, the “start angle” at 90, and then click and drag to draw the star shape. Hold the “Ctrl” key down while drawing to keep the same proportions.
The width of the star should be about 8.7mm or 3.4in and its height 8.2mm or 3.2in. Using the “array” tool once more we will create the lines of the stars. This time we want 6 horizontal copies and 9 vertical copies.
Set “vertical spacing” to 0, adjust the “horizontal spacing” to make the best fit on top of the blue rectangle, and apply the array. Select the last copy on all the in-between lines and delete it.
Now we need to select all the in-between lines and shift them to the right. Hold the “Ctrl” key pressed down and then click and drag to select one line at a time. Having all lines selected, start pressing the right arrow on your keyboard to move the selection to the right.
When moving with arrow keys you can keep the “Shift” key pressed down and the step of the movement will be minimal. Take your time to align them correctly. You can also drag them using the mouse, but you need to hold the “Ctrl” key at the same time to keep moving them on the same horizontal axis.
Select all objects and remove the outline again having all parts selected, make them a group, to be easier to handle later on. Just like that your USA flag is ready! You can save it or even add it to your clipart library so that you have it ready for use in any design. This design can be used to decorate clothing, to make flags, and more.

Make some trimmed 4th of July letters using the flag
Draw a rectangle on top of the flag, only slightly bigger, so that the flag is fully covered. Make sure that the flag is fully covered; if necessary scale the rectangle to fully cover the flag.
Start the “lettering” tool and type any text you like. Adjust sizing so that the text is a good fit on top of the rectangle.
Select both the text shape and then the rectangle. From the “Shaping” menu use “Trim” option and then delete the text objects. Alternatively, instead of applying the “Trim” option you can select “Combine” from the right-click menu. The rectangle will have holes in the shape of the text.
By moving the rectangle or the lettering outlines using the “node editor” you can change what part of the flag is visible through the holes. Once you are ready to proceed, you can select the rectangle part and add a Satin serial outline, in order to decorate the letters later on.
Select both the flag group and the rectangle on top and then from the Shaping menu use the “Trim” option once more. Move the rectangle out of the way and see the text created with the flag design as a fill. Ungroup the flag group and remove any unneeded parts.
If you want to have a satin serial outline around the letters, go to the rectangle part, right-click and use the option “Convert outline to object”. Delete the fill of the rectangle, break the outline apart and remove the outer frame.
Group the outline letters, likewise, group the flag letters, then select both groups and using the align tools center them together.
We are done!
You can download the .DRAW file of the project, for free, from the link below:
- Project’s .DRAW file: USA Flag files
It can open only with the latest version of DRAWings embroidery software
Check also, our related project “How to make a drawstring bag, how to label and decorate it“