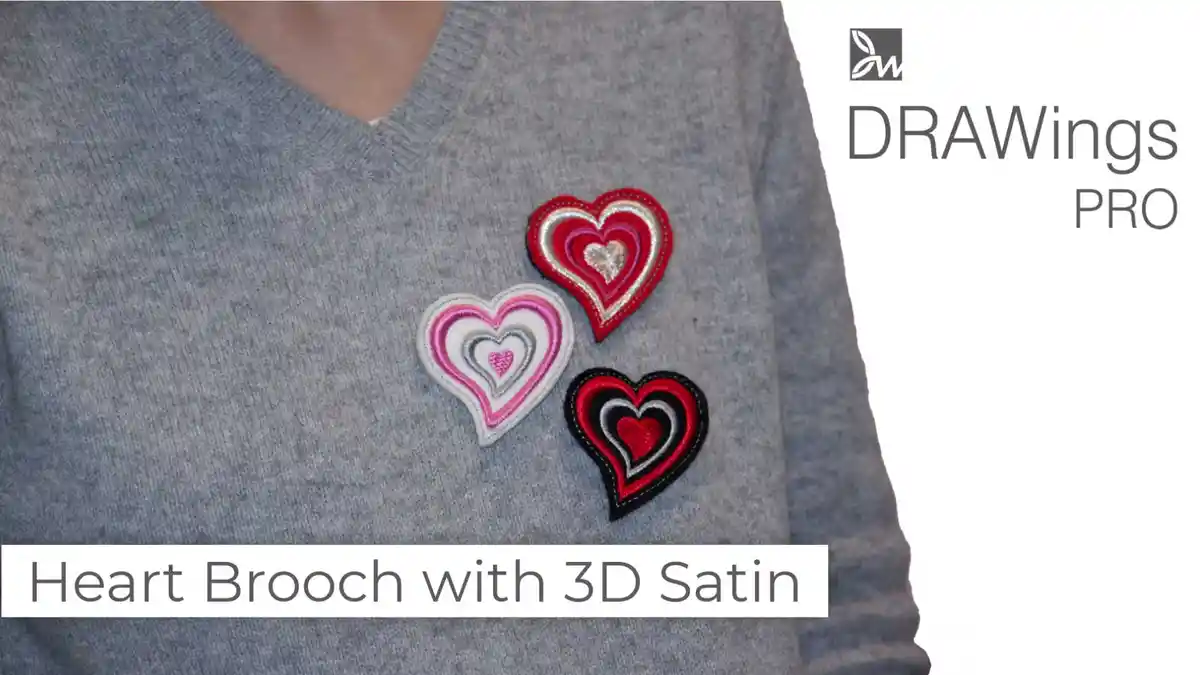
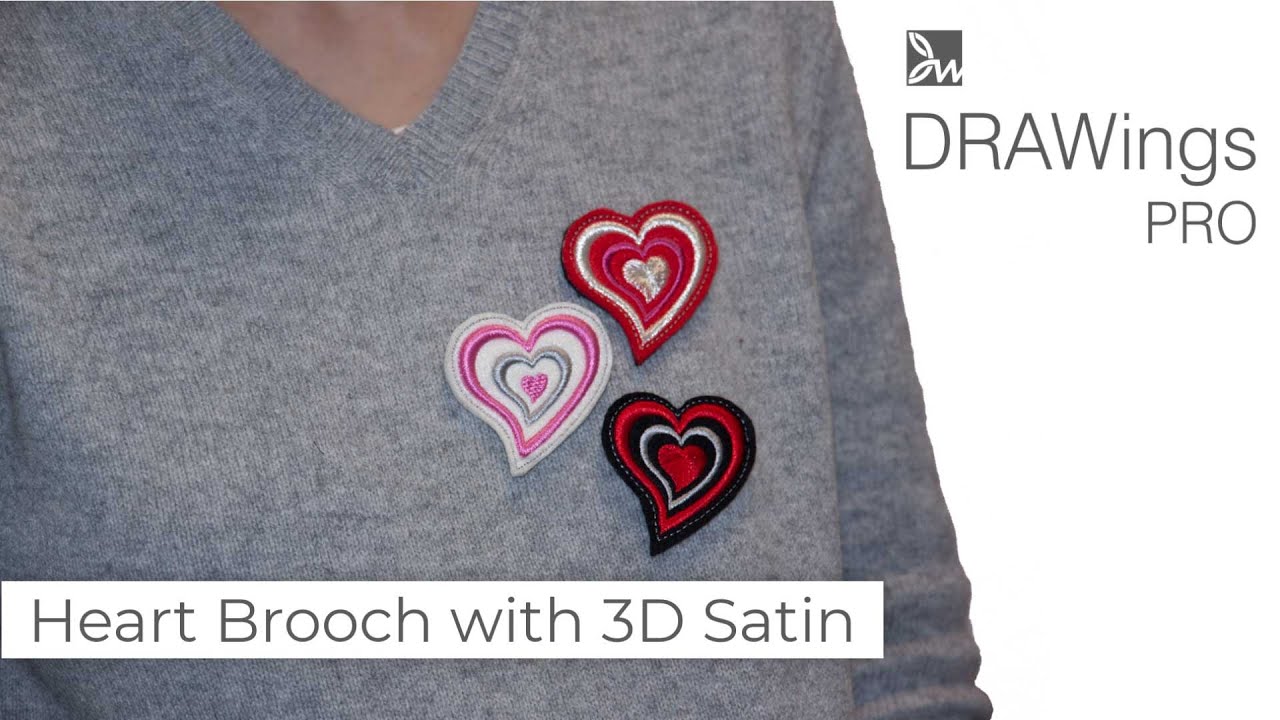
Prepare a beautiful embroidered heart brooch for Valentine’s Day

Heart brooches are fun and easy applique embroideries that can be completed in just a few hours. If you have never done embroidery before, this tutorial will show you how to get started. This heart embroidered brooch is made from felt with fabric glue on the back, so it’s perfect for beginners!
There are only a few days left until Valentine’s Day. Now, no matter how you feel …about that particular day, whether you celebrate it or not, it’s always great to show love and share it with your dear ones. In this tutorial video, we’ll show you how to make a heart brooch. It’s so easy you will want to make a collection for you and some more to share with your loved ones.
View the video below to learn how to do it!
Create the embroidery brooch design
Create a blank design, select a small hoop for this project and a “Felt” fabric from the normal category. Start the “Insert symbol” tool, locate “Webdings” font and find this “Heart” symbol. Select the Heart and click the Insert button. Click and drag to define size and orientation and after placing it remove the outline since it isn’t needed either.
Set the size approximately and move it to the center of the axis. Having the heart selected, make sure the “Proportional” option is enabled and click the “Duplicate” button. Having the duplicate selected, set the size to 80%.
With the new smaller heart selected, click on “duplicate” once more and set the new size to 80% as well. Repeat the process three more times until there are 5 overlapping hearts. With all hearts selected apply “trim” option from the “Shaping” menu.
Set fill type on the shapes
At this point, we need to delete the second and the fourth objects, as they are no longer necessary. Change the color, to have a better view and fine-tune the hearts.
For the outer heart, select the “Satin fill” type from the properties tab, check on the underlay option and select the “3D number 2” underlay type. Likewise, for the middle heart, select “satin fill” type and “3D number 1” underlay. For the innermost heart, we apply again the “Satin fill” type.
Adjust the brooch design with the Stitch Flow tool
At this point, the three heart objects are out of shape, so I’ll show you how you can adjust the shapes using the “Stitch Flow” tool. Having the inner heart selected, start the Stitch flow tool.
From the available types of “directions”, select “point directions” and then click on the heart shape to define a point. If you don’t like how it turns out, go on top of the defined point and click on the ‘X’ that appears to delete the defined point.
Then you can set a new one; take your time to experiment until the design pleases you most. The point direction is placed, the stitches overlap and the thickness increases; so check the density option from the “Properties” and raise the value a little.
Fine tune the outer heart shapes
For the outer hearts we need to fine-tune this turn on the top and the bottom. Start the “stitch flow” once more and this time, we will draw a divider line on the upper corner of the hearts. Select the “Directions” option and draw any direction lines you need to finetune the directions on either side of the divide line.
Likewise, you can enhance the upper part of the inner heart. You will need to do the same for the lower corners of the 2 hearts. If you want to make the heart in the middle a little smaller, you can resize it while keeping the center by holding the “Shift” key down and dragging a corner.
Create the outline of the brooch
To create an outer lining, right-click on the outer heart and select the “Autoborder” option. We will make a running autoborder 2mm from the outside of the shape… with the “remove holes” option enabled.
Assign some colors on the embroidered brooches
Select a dark pink for the heart in the center a pale Grey for the one in the middle and the outer one and dark green for the outer line. Use a different color for the outer line so that the machine pauses during the embroidery process to allow us to place the backcloth.
Adjust the embroidery sequence
At this point, pay attention to the design sequence. For this type of design, it would be better if you started from the inner shape and have the outer ones gradually embroidered. To do so, we need to click on the “auto” to turn off the “Auto optimization”.
You will now see all design parts as separate icons. Move the inner heart at the top of the sequence and the outer one at the bottom. In this way, the 2 grey parts will be embroidered first and then the pink one and the green one will follow. This minimizes the color changes.
Simulate embroidered brooch pin
Switch to “slow redraw” and check how everything is embroidered. If everything is as you like, send the design to your sewing machine in any way that suits you. We are ready to embroider now, so make sure you’ve gathered all the materials you need.
Materials needed and how to embroider the heart designs
We will need:
- 2 pieces 10cm×10cm of felt fabric,
- a Stabilizer,
- Embroidery threads,
- Adhesive spray
- hoop that fits the design

Hoop a stabilizer
Place your fabric in the center of the hoop using an adhesive spray. Alternatively, you may secure your fabric in place with pins or tape. Be careful so that pins are out of the needle’s way, though.
Open the design in the machine
Set the bobbin and needle thread, attach the hoop to the sewing machine and start embroidering. Keep in mind that when the design has 3D underlay, it will increase in thickness as the embroidery proceeds.
Important: To avoid any hassle from the foot hitting or pushing the embroidery, make sure that you adjust the foot height while embroidering and as the thickness of the embroidery increases.
Start embroidering
When the first layer of underlay is sewn, stop the sewing machine to set the foot height. Here, I set it 3 mm higher than the first position. Make sure you set the height to suit your sewing machine and design. Then press the start button to resume embroidering.
Knowing that the output is even more raised, I will also raise the foot by 2 more mm. I’m afraid there’s no shortcut to this procedure, as setting the foot too high from the beginning, will cause the cloth to flutter, so I strongly recommend you to adjust it little by little following closely.


Finalize the embroidered brooch
When the embroidery brooch is complete, remove the hoop from the sewing machine and turn the hoop over. Use an adhesive spray to apply another piece of cloth to cover the back of the design(pin backing). Attach the hoop back to the sewing machine and remember that having added another layer of cloth, we will have to increase the height of the foot once again, accordingly.
Press “Start” to stitch the front fabric and lining together. When the seam is complete, remove the hoop from the sewing machine, remove any pins, and tear away the stabilizer from the seam.
Cut out the design from the outside of the seam with scissors. Sew a bar pin on the back and It’s done! Feel free to change the colors of the cloth and threads, experiment with various stitches and enjoy making your lovely brooch!
Final thoughts
The embroidered heart brooch project provides a step-by-step guide on how to create a 3D embroidered heart brooch for Valentine’s Day. The materials needed and the steps involved in the embroidery process are outlined, including tips on how to adjust the height of the foot depending on the thickness of the embroidery. The final product is a beautiful and festive addition to any outfit!


You can download the .DRAW file of the project, for free, from the link below:
- Project’s .DRAW file: Heart brooch
It can open only with the latest version of DRAWings embroidery software
Check also, our related project New Year’s Towel with Applique