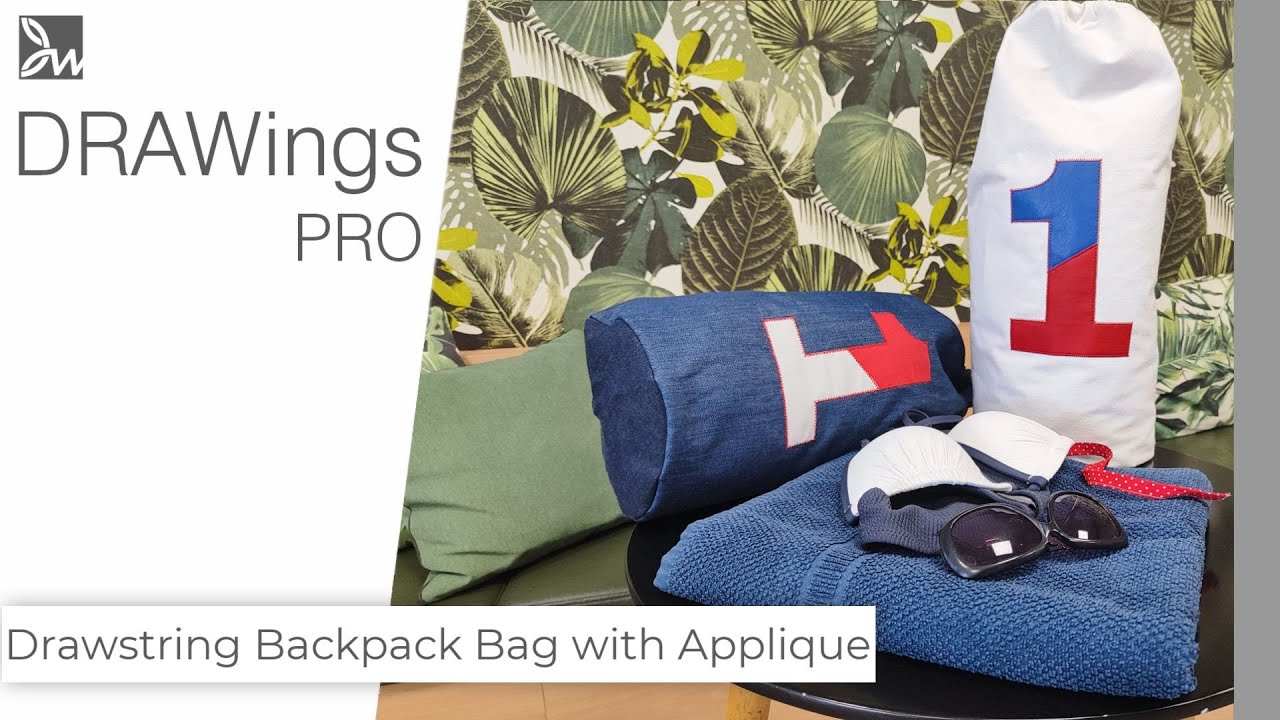
DIY Drawstring Backpack with Applique Decoration
Have you ever wanted to make your own Backpack with Applique Decoration? Look no further as we have the perfect summer DIY project for you. This drawstring backpack is not only unique, but it also allows you to carry all your essentials with ease. Whether it’s for everyday use or your next trip, it’s the perfect addition to your accessory collection. The vivid two-colored applique design will make you stand out in any crowd.
And, if you’re feeling extra creative, you can even make it into the perfect Father’s Day gift. This tutorial will guide you step-by-step on how to create a striking product with your own applique decoration using the knife tool. The finished backpack is the perfect size, measuring 18 cm wide and 50 cm tall. So, gather your materials and let’s get started on this fun and practical project.
Materials: Before we begin, gather the following materials:
- Canvas fabric for the bag body
- Assorted fabric for the bag’s circular bottom
- Small piece of fabric for the side tab
- Two fabrics for the applique parts (measuring 15 cm x 15 cm)
- Vinyl (optional) for a shiny look
- String (approximately 200 cm or 79 inches long)
- Interfacing, stabilizer, adhesive spray
- Assorted threads
- Embroidery machine with cutting needles or digital cutter
- Scissors, erasable pen, iron, clips or pins.


Step 1: Designing the Applique
- Select a hoop suitable for your design and use the text tool to create your chosen character or design.
- Adjust the size and center it within the hoop.
- Convert the design into an applique type, which involves attaching a fabric piece during the sewing process.
- Set the fabric trim option as per your available tools (pre-cut with cutting needles or manual trimming).
Step 2: Adding Decorative Stitches
- Use the ‘Autoborder’ tool to add decorative stitches around the applique design.
- Adjust the settings for distance, repeats, type, density, and outline width to achieve the desired effect.
Step 3: Splitting the Applique Design
- Use the ‘Knife’ tool to split the design into two parts.
- Set different colors for each part to visualize the final design.
- Adjust the outline width and offset to position the holding stitches and cover them effectively.
Step 4: Creating Additional Satin Serial Outlines
- Use the outline shape tool to draw a line where the two applique parts meet.
- Set the type, outline width, and density for the satin serial outline.
- Adjust the sequence of embroidery to ensure the line is embroidered before the final autoborder.
Step 5: Prepare for Cutwork
- Start a new design and select a hoop suitable for one of the appliques.
- Copy and paste the applique part into the new design, removing the fill color.
- Set the outline to Cutwork and add zigzag stitches for stability.
Step 6: Cutting the Applique Fabrics
- Hoop stabilizer and use adhesive spray to hold the fabric in place.
- Follow the machine’s instructions to cut the fabric using the cutting needles.

Step 7: Embroidering the Applique
- Mark the placement point on the base fabric and hoop it with stabilizer.
- Embroider the guide stitch, place the applique fabric, and secure it with adhesive spray.
- Proceed with the holding stitches and satin serial outline for both applique parts.
- Remove the stabilizer carefully to reveal the finished applique.


Step 8: Creating the Side Tab and Sewing the Bag
- Prepare the side tab fabric by folding and sewing the edges.
- Mark the points for the drawstring placement on the bag and fold the edges.
- Sew the edges and apply interfacing to strengthen the fabric.
- Attach the side tab and sew the bag’s sides, leaving the top open.
Step 9: Attaching the Bottom and Finishing Touches
- Attach the circular bottom fabric by sewing it to the bag body, ensuring it’s centered.
- Fold and press the top edge of the bag to create a clean finish.
- Sew parallel lines around the bag’s top edge to create a casing for the drawstring.
- Thread the string through the casing, knot the ends, and adjust the length to your preference.
- Embellish the bag further by adding optional vinyl accents or embroidery details.
The Drawstring Backpack with Applique Decoration
Congratulations on completing your own stylish drawstring backpack with a unique applique decoration! This versatile and eye-catching bag is perfect for all your summer adventures, allowing you to carry your essentials with ease while showcasing your creativity. By following the step-by-step instructions provided, you’ve learned the art of designing appliques, embroidering them onto fabric, and assembling the bag. Feel free to customize the design, fabric choices, and colors to make it truly your own. Enjoy your new backpack and happy crafting!


You can download the .DRAW file of the project, for free, from the link below:
- Project’s .DRAW file: Drawstring Backpack with Applique Decoration
It can open only with the XI and later versions of DRAWings embroidery software
Check also, our related projects “How to Make a Detachable Collar with an Embroidered Monogram” & “HOW TO MAKE A BEAUTIFUL RABBIT KEY COVER FROM SCRATCH” & “DIY: HOW TO MAKE A CUSTOM GLASSES CASE WITH YOUR OWN DESIGN“
FAQs
Remember, DIY projects are all about creativity and adaptability, so don’t hesitate to experiment and make the drawstring backpack truly your own. Happy crafting!