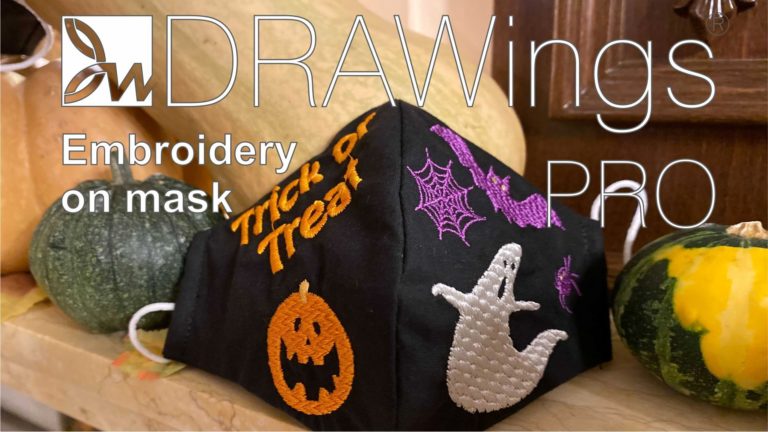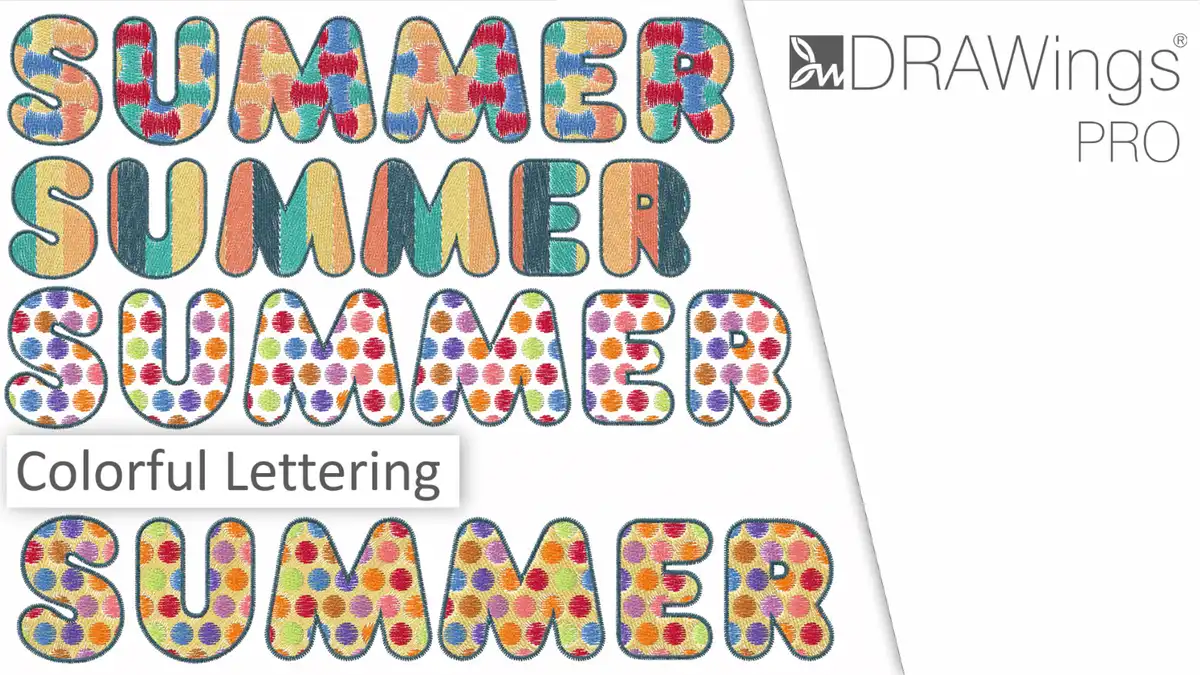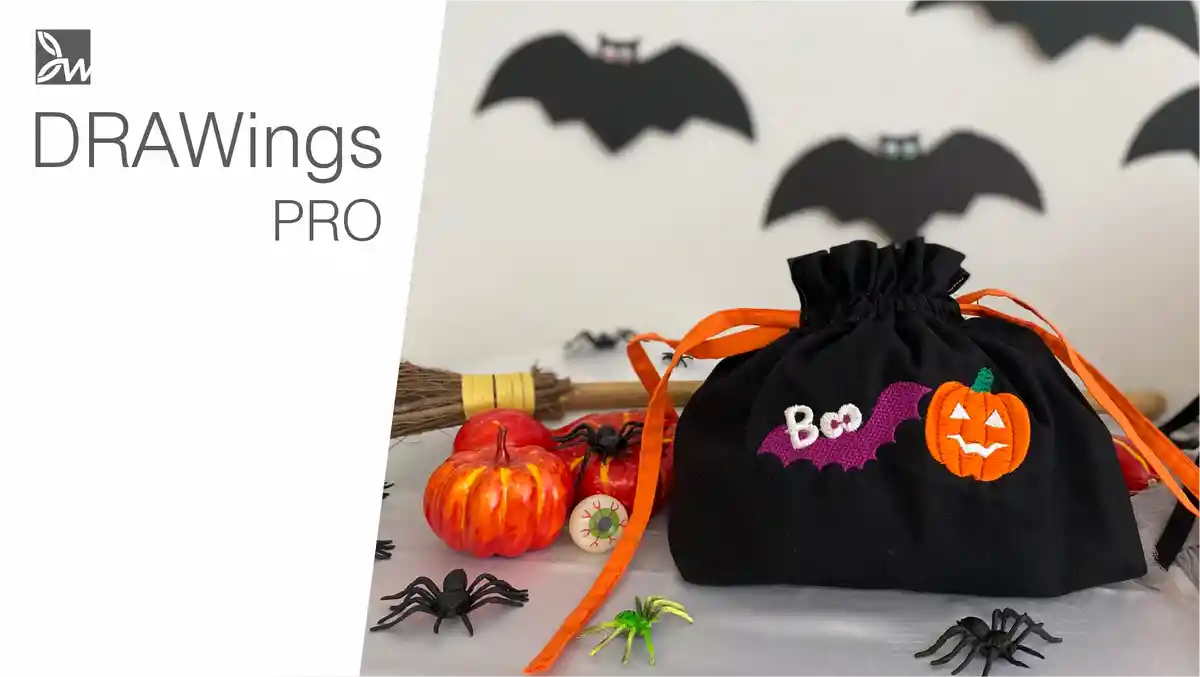
Trick-or-Treat! How to make a unique Halloween drawstring bag
Trick-or-Treat! This Halloween, why not try something different and make your own drawstring bag? In this video, we will show you how to make a Trick-or-Treat drawstring bag. This is a great project for kids, and it’s easy to customize the design to fit your needs. There are many Halloween designs out there, so you can easily find an image that inspires you to download and use it. So gather up some supplies and let’s get started!

For the purpose of this video, we will start with a bitmap image, show you how to digitize the shape of the pumpkin and then how to customize the pumpkin and create your own design, along with the drawstring bag!

Create a design for the Halloween drawstring bag
Start with a new design and import the image you have selected. The load image dialog will appear, so open the image as backdrop to digitize on top of it. We will only use this upper left pumpkin, so we will crop out the rest.
Re-size the design, to be about 7.5cm by 7.5 or 3 by 3 inches and press ok to proceed. Start the outline shapes tool and digitize the pumpkin shape.
Create the outline shape of the pumpkin
By default, the tool creates connected curves, but if you want to make a corner or sharp change, you may hold the Shift key down right before adding the point which will create the corner, turn or with which a new curve starts. When you are done with the Shape, go to View menu > Backdrop, and enable the option Above Embroidery option. In this way, you see the backdrop on top of the stitches.
We can fine tune the shape, if necessary, using the node editor. Set the color to orange and then in the same way, we can create extra parts like the pumpkin’s stalk.
Create the pumpkin’s stalk
We want our stalk to look a little different than the original one. Set the color to green and change the fill into row fill. Remove short-long stitches and increase the density. By using the stitch flow tool, we’ll change the direction of the stitches and send the stalk at the back of the design.
Create the ribs of the pumpkin
To design the ribs of the pumpkin. We will show you how to do this using Vector type. Start Digitize outline shapes tool and draw lines on top of the lines of the pumpkin. Once you have created the lines, go to Rectangle selection mode and set their outline type into Vector. Hide the backdrop (Alt +1) temporarily to have a clearer view of the effect on the design.
It should definitely look more like a pumpkin now. Change the direction of the stitches and bring back the backdrop above embroidery, to create the eyes and the mouth. Remember to hold the Shift key down, to make all the corners sharp. Select everything and remove all outlines.
Fine tune the pumpkin design
Take your time to fine tune the design as you like. For example, we prefer the mouth to be rather smaller and make it satin. We will also edit the eyes a little bit, probably rotate them or change their size and my pumpkin is ready. For easier handling later on, make sure that all pumpkin parts are one group.
Add some decorative parts
We can copy the bat silhouette and bring it into our current design from a design we already have in our designs. Experiment with the sizes so that you strike the right balance; for instance, we would like to make our pumpkin a little smaller and the bat bigger.
We would also like to set this weave pattern to the bat’s body for better texture and by using the text tool and some shapes let’s design a “Boo” wording on the design.
Add some lettering
Start the text tool and type the letter ‘B’. You may scroll through all the available fonts to find the one suitable for your take of the design. You may either just type the word Boo or have fun playing with it.
In that case, start the ellipse tool and click and drag to create an oblong ellipse. Then, press the duplicate button to create a duplicate of that ellipse. Move the second circle close to the other so that they look like eyes!
Set the fill type to Satin, and, by using the Stitch flow tool, set a point direction to bring the stitches to the center of the shape. Likewise, draw 2 smaller circles to go on top of the eyes, as pupils. Select all 4 circles to remove the outlines and set a matching color for the eyes’ pupils.
As you’ve probably guessed by now, the intention is to have the double ‘O‘ of the word boo to serve as the bat’s eyes at the same time!
Final touches
Move the Bat, resize it a little bit, perhaps rotating the pumpkin a bit to the right. Switch to slow redraw to check how the design is to be embroidered. Slow redraw is a useful part, as it saves you from mistakes which can be spotted early on. Let’s say we don’t like this part embroidered on top of the B.
Select the letter B and from the properties toolbar set the option Remove Overlaps to Never. In this way the software will embroider all the white parts at the end, as we’ve instructed it to do. One more thing to check is the length of the lines. When measured, we realize that they are about 2 cm long or even longer. This is not good as it may cause problems during production.
To tackle this, rearrange the vector lines and add additional ones, to create more ribs on the pumpkin. First select the vector object and break it apart so that we can handle each rib individually. Let’s move the outer ones closer to the edges of the object; move the one in the middle and finally, create a duplicate of this one and move it to create another pumpkin rib. Take your time to achieve the best look, even using the node editor to optimize those curves.
Supplies needed for the Halloween bag
Now that we’ve finished with the design, let’s move on to sew our own drawstring bag. We will need the following materials:
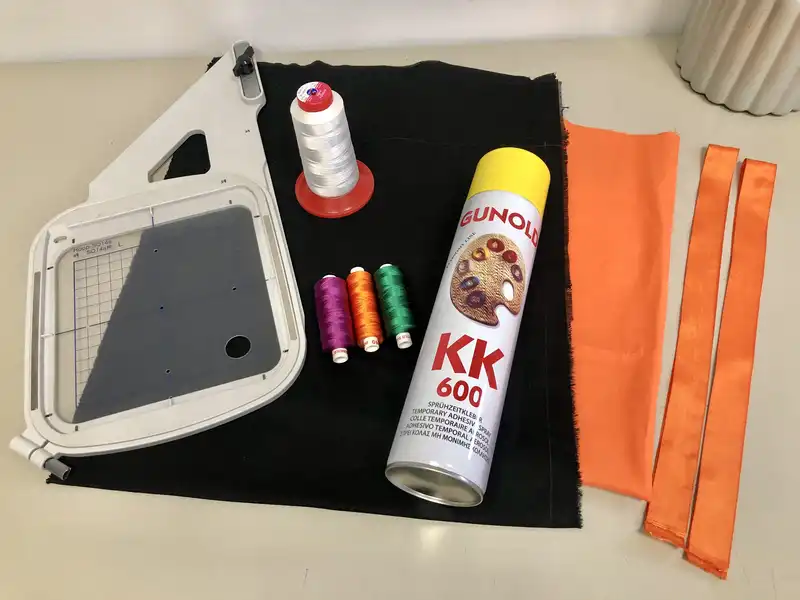
- Fabric,
- Assorted threads,
- Tear-away stabilizer and adhesive spray are optional and we recommend you to use the software’s printout, as well.
How to make the Halloween drawstring bag – Trick-or-Treat!
Cut the fabric in two pieces of 35cm by 35 cm or 13.7 inches by 13.7 inches. You may finish the edges with a pinking-shears or zigzag stitch to prevent fraying. Mark the center of one of the fabrics with your pencil.
Mark also 6 cm / 2.3 inches off the edge of the fabric. Place the fabric that you will embroider into the hoop using the guideline and print-out, to place the design on the right spot and ready to begin embroidering!
Place the two fabrics, right sides facing together. Mark 12 cm / 4.7” from the top and start sewing. Use the seam roller or iron to open the seam allowance. You may sew the raw edges so that they look neat, but make sure you keep them apart.
We will fold the upper part of the bag and make the casing for the ribbon. Measure 2 cm or 0.8 inches from the top and fold it firmly. You may iron it to hold it in place. Fold 5 cm or approximately 2 inches from the folded part. Again, you may use your iron to keep this in place.
We will sew the edges first, mark 2 cm or about 0.8 inches above from where you just sewed and the casing for the ribbon is ready. To give our bag more volume, fold the bottom corners on both sides.
Mark 4 cm or 1.57 inches from the top of the corner, thus drawing a line of approximately 8 cm or 3.14 inches and sew along this line.
The bag is nearly ready, just use your preferred cords or ribbons and get ready for happy trick or treating!
Happy Halloween!


It can open only with the latest version of DRAWings embroidery software
Check also, our related project “Create a beautiful PaintStitch tote bag“