Create a unique bandana cap with your embroideries
If you’re looking for a summer accessory that’s both fashionable and functional, look no further than the bandana cap! This unique headwear option can be easily customized to match your personal style. Simply choose a bandana in your favorite color or pattern, and then use embroidery floss to add embellishments such as flowers, spirals, or geometric shapes. You can even add a bit of bling by stitching on some beads or sequins. Not only will your one-of-a-kind bandana cap keep you cool and protected from the sun, but it will also turn heads wherever you go.
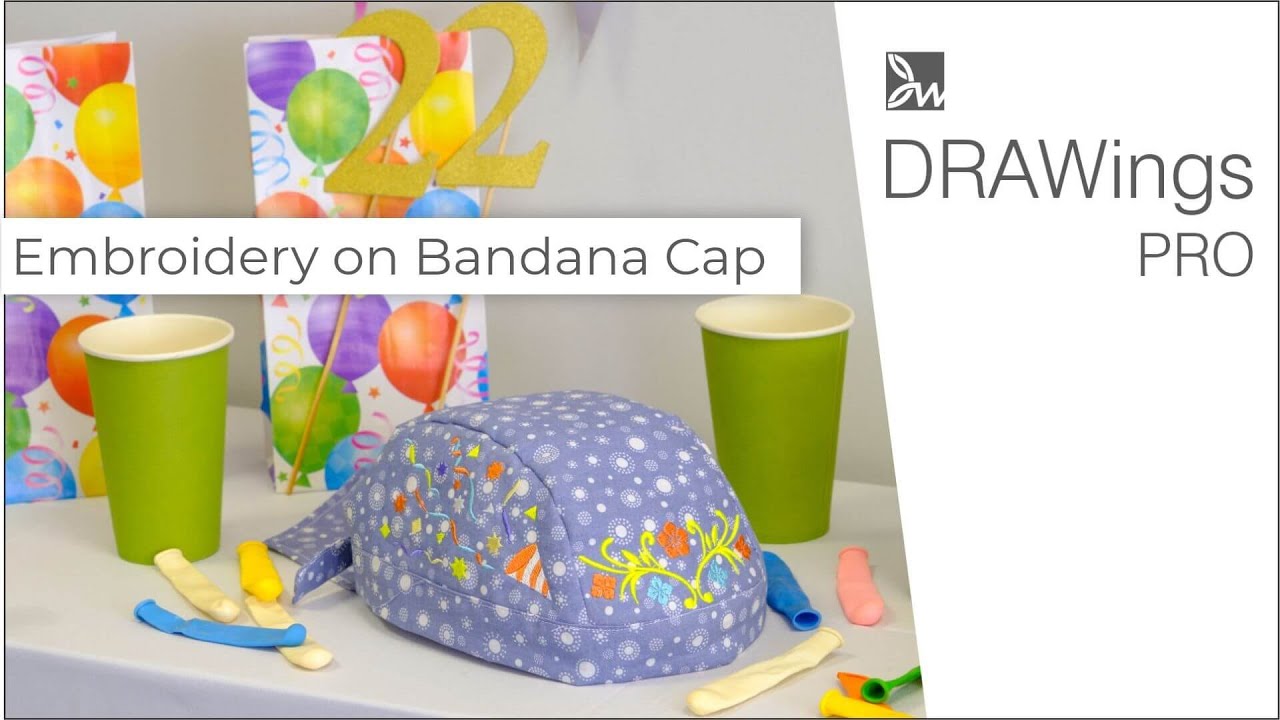
In this video we will show you how to create a bandana cap with your original embroidery design.
Bandana caps can be used for many purposes, such as personal styling, sun protection, even dust protection.
There is a great variety of patterns you can use to sew a bandana, and I’m sure you can find one you’re most comfortable with. For this project, we’ve created our own pattern which you can find at the end of the post.
Create an bandana cap design
According to our trials, it was comfortable for the majority of the people who used it. Our pattern is suitable for Head circumference: 52cm to 65cm, 20in to 25.5in. Let’s see how you can make the bandana.
For this project we are providing a set of draw files. One file includes all pattern shapes, which we will later print and use as guides the cut out the cloth for the bandana. There are also 3 more files which contain only the parts of the bandana pattern which are to be embroidered.
Use the template to create the bandana shape
You need to open the templates and place the designs you want on your bandana within the red lines. We will begin with the Template front. Notice that you may need to change the hoop into the closest match from the hoops of your machine. On this design you need to put the embroidery that will be on the front of the bandana.
On the design Template-tail, you may add the design you choose for the tail of the bandana and for the design “Template sides” you need to create or import any design for the sides of the bandana. The designs you use will suggest the overall style of your own bandana.
Place the designs on the bandana template
We’ve opted for a birthday party style, so we chose these designs. For one side we will create the text part, using text on path. Start the lettering tool and click where you want the text to start. The position can be changed later, so don’t fret over it. Enter the characters you want to use, set the “Font name” and “size”, add one more text object and set the thread color.
Apply the “On user path” to the texts and use “Node edit” tool to adjust the position of the text freely. By editing the curve upon which the text is placed, you can freely edit the position and placement. Once the designs are in place, change the sequence to “Manual” and check the embroidery order. Make sure that the guide stitches are on top so they go first.
Have in mind that the red line of the template is simply a guide line for placing the design. It is set as artwork type, so it will not be embroidered. Once your designs are complete, they are ready to be sent to the sewing machine.
Print the Bandana pattern
Let’s print the patterns by opening the Bandana pattern and click the “Print” icon. At this point, You will get a warning that the bandana pattern design doesn’t fit in the hoop. Click ‘ok’ to proceed, practically ignoring this particular warning, as you will only print the template for the bandana itself and not send the bandana pattern to the sewing machine. At the printout dialog, click the “Design only” option, enable the “Fill areas” print item if it is not enabled and make sure that you are printing at an 100% scale.

Create the cut outs
Cut out the parts highlighted in orange in this video, so that you can piece together neatly, without gaps, each individual part of the pattern for the bandana. Tape the pieces of each individual paper of the pattern, so that the solid lines fit perfectly together. Then, you can cut out the three paper patterns, string, top and side.
We will use those 3 patterns now, to cut the cloth. To sew your own bandana, you need a cloth that is 27 cm (11 inches) long and 114 cm (45 inches) wide. Fold the cloth in half, align the left side of the string paper pattern with the folded part and the bottom of the pattern with the bottom of the cloth. Pin the pattern and trace the shape of the pattern on the cloth.
Remove the paper pattern, pin the overlapping sides of the cloth together, so that they do not move,
and cut along the traced outline of the paper pattern. Then, open the cloth that was folded in half, put the top paper pattern on it, trace it. and cut it out. Fold the remaining cloth, again in half, put the side pattern on it, trace it and cut it out, too. All the parts are now cut off.

Add the embroideries on the bandana
We will move to the embroidery part, starting with the designs for the side parts of the bandana. Open the design in the embroidery machine, hoop your stabilizer, set the bobbin and needle thread, and attach the hoop to the machine. Press the start button and sew the guide stitch.
Remove the hoop from the sewing machine and place the cloth along the guide stitch. You can use tape or a pin to secure the cloth in place, so it doesn’t move. We suggest to use adhesive spray because it is really convenient. It sticks firmly and can be easily peeled off.
Attach the hoop to the sewing machine and press start to embroider. When the embroidery is complete, remove the hoop from the sewing machine and the stabilizer from the hoop. Then, load the tail design, hoop a new stabilizer, attach the hoop to the sewing machine and press the start button to sew the guide stitch.
Place the cloth along the guide stitch and embroider it. After embroidering the tail, remove the cloth from the stabilizer and hoop a new stabilizer for the front part. In the same way you can embroider the template front design. When the embroidery is complete, remove the stabilizer from the cloth.
Put the bandana pieces together
All parts have been embroidered and we are ready to sew the parts together. Sew around the parts with zigzag stitch or over-edge stitch so that the cloth does not fray. Fold and sew the end of the back of the head of the side part by 1 cm (0.4 inch). Align the edges of the side parts with the top part, making sure the embroidery has the right orientation, and pin them together.
Then sew the different parts together. Likewise, pin the other side and sew together with the front. Fold and sew the tail part by 1 cm (0.4 inch). Fold the end of the string by 1 cm (0.4 inch) and iron it to make a crease. Mark the center of the string and mark the center of the string and the crown. Match the center of the crown of the bandana and the center of the string and pin together.
Fold the edge part of the string in half and sew. After sewing, cut off the excess corner, turn the inside out, follow the same steps for the other end of the string and sew the crown of the bandana and string together. Pull down the unsewn side of the string and fold it back to the other side, pin around and sew the edge.
We are done! You can use those bandanas as a summer or fashion accessory, or as party favours, as we did! In any case, don’t forget to share your creations with us!


You can download the .DRAW file of the project, for free, from the link below:
- Project’s .DRAW file: Bandana cap files
It can open only with the latest version of DRAWings embroidery software
Check also, our related project Eastern fabric basket